Baking with B: Garden Herb Scones

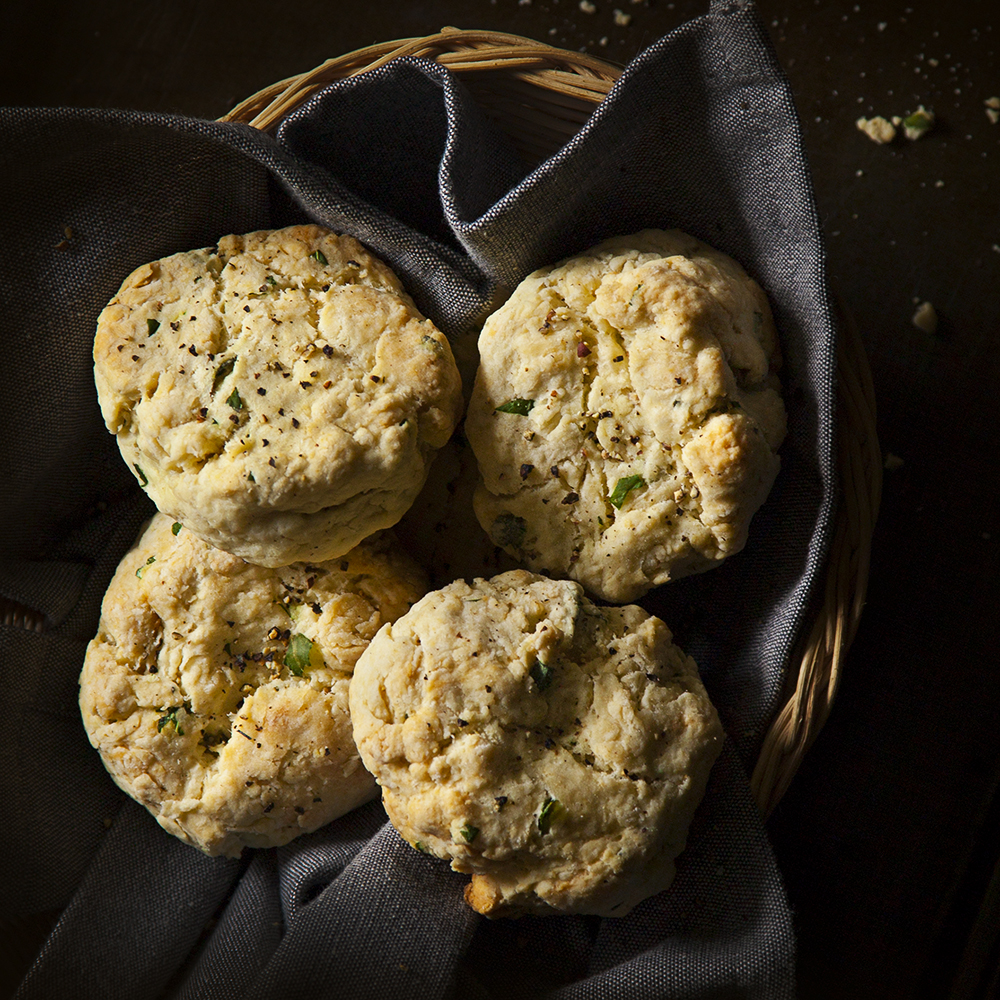
Guys, I know you think I’m all fancy-like but when I say these scones do not take up a lot of time it is the absolute truth. You’d think a treat associated with something as fussy as a tea service would be complicated but they are not. The hardest thing about baking these is going to be deciding what you’re going to put in them. I used fresh herbs from my garden (because they’re running amok, please, someone come help me) but you could put in grated cheese, raisins, nuts, dried fruits, fresh fruits…see? I told you it was going to be hard.

Garden Herb Scones (makes approx. 12)

4 tbsp butter, softened

1 egg, beaten

1/4 tsp salt

2 c. flour

1 tbsp. baking powder

5 tbsp. milk

fresh herbs, finely chopped (to taste)

Preheat the oven to 400F. Beat butter and eggs together until creamy; set aside. In another bowl, sift together flour, salt and baking powder. Add dry ingredients to the butter mixture a little bit at a time, alternating with the milk. Mix in your herbs (in this case, I used rosemary, basil and sage). Using your hands, form a ball shape then place on a baking sheet lined with parchment paper. Use your fist to flatten the tops gently, but not enough to take away that nice rounded edge. Bake in oven for about 20 minutes or until golden brown. Serve as soon as they’re cool enough to eat!

B’s Tip: Nobody’s perfect, and sometimes your measurements may be a little bit off. Adding the milk a little bit at a time allows the batter to form without getting too slimy or wet. If you find you’ve reached the perfect consistency before you’ve added all the milk, you can stop right there. Mixture still feeling a little dry? Go ahead and put it all in!

Happy baking!

B

Baking with B appears (usually) every other Monday on the Keeping Busy with B Blog. Find out why I like baking so much here. For more of my baking, click here. And for even more recipe inspiration, check out my Pinterest full of food eye candy that will have you licking your computer. Promise.

Baking with B: Peanut Butter and Jelly Cupcakes

15bfp-pbjcupcakes-1500

My childhood home was within walking distance of my elementary school and because my parents ran their own business they were often around during the day and I was lucky enough to go home during the lunch hour and decompress before heading back to class for the afternoon. This lasted all the way through high school, so I consider myself pretty lucky to skipped the ritual of navigating the cafeteria and its famously terrible food throughout most of my grade school career.

Seeing all the kids going back to school made me a little nostalgic for ye olden days, so I decided to make these cupcakes reminiscent of everyone’s favorite childhood sandwich. (I realize this assertion dates me but give me a break here- when I was younger we had zero peanut butter allergies in our school and these would have totally been allowed.)

Peanut Butter and Jelly Cupcakes (makes 18)

Cupcakes
1 3/4 c. all-purpose flour
3/4 tsp. baking powder
1/2 tsp. salt
1/4 tsp. baking soda
6 oz. (1 1/2 sticks) unsalted butter, softened
1 1/3 c. sugar
2/3 c. smooth peanut butter
3 large eggs
1/2 c. sour cream
1/2 tsp. pure vanilla extract
strawberry jam, for topping

Frosting (makes about 3 c.)

6 oz. cream cheese
1/3 c. icing sugar
1/2 tsp. salt
1 c. smooth peanut butter
1/2 tsp. pure vanilla extract
1/2 c. whipping cream

Preheat oven to 350F. Cream together butter and sugar in medium-sized bowl. Add peanut butter, eggs, sour cream, and vanilla (in that order, thank you very much) and mix well. In a separate bowl, sift together dry ingredients. Mix in with wet ingredients gradually until well-combined.

Grease muffin pan or line with liners and use a spoon or an ice cream scoop to fill each cup 3/4 full. Bake for 20 minutes or until tops spring back to the touch. Place on a rack on cool completely before icing.

B’s Tip: You can make the frosting ahead of time as it keeps for up to 2 days in the fridge. Just bring it to room temperature and mix until smooth to get it all spreadable again.

To make the frosting, cream icing sugar and cream cheese together in a medium-sized bowl. Add salt, and mix in gradually the peanut butter, then the vanilla. Whisk cream in a separate bowl until soft peaks form, then fold into peanut butter mixture. Frost cupcakes and decorate each with a dollop of jam in center. Decorated cupcakes will last in the fridge, covered, for up to 2 days.

B’s Tip: If you’re using a jam with a lot of whole berries in it, make sure to macerate any larger chunks of fruit before decorating. Trust me, it makes the whole dolloping experience way easier.


These cupcakes are surprisingly moist and cake-y and probably are just as great for you as the sandwiches were. So why not call a spade, a spade, and eat your PB and J in cupcake format? The consensus is that strawberry jelly is the way to go, but my personal favorite is raspberry. What’s your jam? (See what I did there?)

KBwB-BFlower-50Baking with B appears every other Monday on the Keeping Busy with B Blog. Find out why I like baking so much here. For more of my baking, click here. And for even more recipe inspiration, check out my Pinterest full of food eye candy that will have you licking your computer. Promise.

Baking with B: Best-Ever Bran Muffins

KBB_baking_bran_muffins Days like these when the sun is bright and the weather is warm it’s too tempting to go outside instead of staying indoors and doing something boring like eating breakfasts. In the mornings when I’m feeling like I want to go, go, go it’s great to have these around to take to the library, to work or even for a snack on a particularly long dog walk. Don’t limit yourself to this basic recipe either- make it your own with dried or fresh fruits, nuts, seeds, chocolate chips, peanut butter, cream cheese, etc. The list goes on and on, like these endless early summer nights.

Bran Muffins (makes 12)

1 1/2 c. wheat bran

1 c. buttermilk

1/3 c. vegetable oil

1 egg

2/3 c. brown sugar

1/2 tsp vanilla extract

1 c. all-purpose flour

1 tsp baking soda

1 tsp baking powder

1/2 tsp salt

1/2 c. raisins

Preheat oven to 375F. Grease muffin cups or line with paper muffin liners. Mix together wheat bran and buttermilk and let stand for 10 minutes. In a separate bowl, beat together oil, egg, sugar and vanilla. Add to the buttermilk/bran mixture. Sift together dry ingredients, then stir flour mixture into buttermilk mixture, until just blended. Fold in raisins and spoon batter into prepared muffin tins. Bake for 15 to 20 minutes, or until a toothpick inserted into the center of a muffin comes out clean.

Happy baking!

B

KBwB-BFlower-50Baking with B appears every other Monday on the Keeping Busy with B Blog. Find out why I like baking so much here. For more of my baking, click here. And for even more recipe inspiration, check out my Pinterest full of food eye candy that will have you licking your computer. Promise.

Baking with B: Cappuccino Cupcakes

BFoodPix-ChocMuff1-031-1500

Don’t be fooled by these tasty little fellas. They’re masquerading as chocolate cupcakes but they’ve taken on a little more of a grown-up flavor. No, there’s no booze in them (although that might be an interesting experiment) but is there espresso powder which probably means they’re not that appropriate for the kiddos. Or maybe you’re baby-sitting and want to return the kids full of sugar and caffeine. In that case, I give you permission to bake away. Nothing goes better with coffee than chocolate anyway.

Cappuccino Cupcakes (makes 24)

1 c. butter

1 3/4 c. sugar

4 large eggs plus 2 large egg yolks

1 tbsp vanilla extract

3 c. cake flour (spooned and leveled)

1 tbsp baking powder

1/2 tsp salt

1/2 c. buttermilk

3 tbsp espresso powder

1 c. semisweet chocolate, finely chopped

Bring cold ingredients to room temperature before starting to mix your batter. Preheat oven to 350F. Grease or line 24 standard muffin cups. In a large bowl, cream together butter and sugar. Beat in eggs and yolks, one at a time, until combined. Beat in vanilla. In another large bowl, whisk together cake flour, baking powder and salt. Add 1/3 c. of the dry ingredients to wet ingredients, beating to combine. Beat in 3/4 c. buttermilk, another 1/3 c. of the flour mixture and alternate between buttermilk and flour mixture until all ingredients are combined. Do not overmix.

In a small bowl, combine espresso powder and 2 tsp hot water. Stir espresso and chopped chocolate into batter and divide among muffin cups. Bake until a toothpick inserted in the center comes out clean, about 20 minutes, rotating halfway through. Let cool in pans first, about 5 minutes before transferring to racks.

B’s Tip: You can use whichever icing recipe you like, but my particular favorite for this recipe is just straight up chocolate. For an extra caffeine kick, you may want to try mixing it in with extra coffee or espresso.

Happy baking!

B

KBwB-Flower-50


Baking with B (usually) appears every other Monday on the blog. I just love cupcakes though, which is why I’m feeling extra generous this week. Find proof on just how crazy I am about cupcakes here. Find out why I like baking so much here. For more of my baking, click here. And for even more recipe inspiration, check out my Pinterest full of food eye candy that will have you licking your computer. Promise.

Making cupcakes for a crowd? Never fear. I shared my method on how do it here. Want more cupcake recipes? I’ve got some delicious ones here.

Cupcakes for the Masses

7BFP-SpringCupcake-SQ1000-05
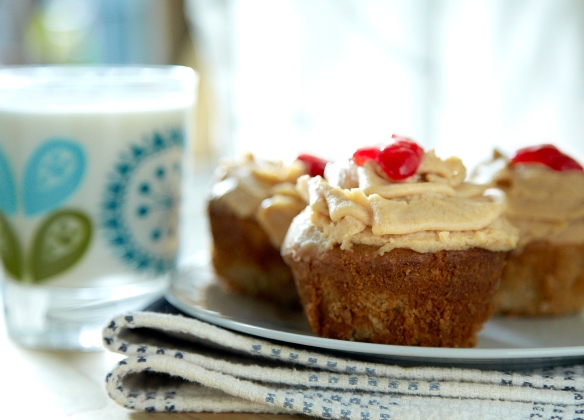
There was another birthday party at the office. Guess what happened. This.

The request this time was for cupcakes, of all flavors, and after I briefly considered opening a bakery, I decided the only way to approach this task was to make it as efficient and simple as possible. (Who says you can’t mix productivity and baking?) See, I’m a not a professional cake decorator or baker (although sometimes I pretend to be when I break out my cake decorating kit with all of the fancy icing tips) and although I do enjoy having people over for coffee or brunch, I’m not really accustomed to making things for a large group of people, let alone bake and decorate cupcakes en masse.

So maybe I cheated a little bit and made a giant batch of my favorite vanilla cupcake recipe (which you can find here and multiply according to your needs). Despite the numerous (and extremely varied) requests I received, I decided to narrow down my flavors to three classic options: plain vanilla, chocolate chip and butterscotch chip. Oh, and they were all going to have buttercream icing too. Ba-bam. Who could argue with that?

Once my batter was mixed, I divided into three separate mixing bowls. I left one batch plain and stirred in 1 c. of chocolate chips into one, and 1 c. of butterscotch chips into another, stirring gently to mix. I baked them according to the instructions here and left them on a rack to cool completely before decorating.

To “color-code” all of the flavors, I found three different patterns of muffin cups and decided to coordinate them with three different colors of frosting to further increase the recognition. Making several colors of frosting can be labor-intensive but luckily isn’t too difficult once you’ve made yourself a big batch of icing and separate it accordingly. I never worry about making too much icing- it’s always handy to have some extra on-hand to clean up mistakes. In my case, having too much icing was a little bit of a happy accident- I wasn’t initially going to draw flowers but I couldn’t resist using up the rest of those sweet spring colors.

It feels silly to admit it now, but baking such a large amount of cupcakes was a (needlessly) intimidating experience for me. Despite the fact that they were not among my best or most exciting baking adventures, they were definitely one of the simplest and weren’t any less tasty. It was worth it to see the look on everyone’s face when I brought a giant plate of them out into the waiting room. It reminds me that I bake for my own enjoyment and for others; my baking is for sharing, and not for impressing other people.

Besides, sharing is totally calorie-free.

KBwB-BFlower-50

Why just stick with baking a big ol’ batch of vanilla? If you’re the mood to change things up a little bit, I’ve baked chocolate cupcakes, banana cupcakes and a whole whack-load of muffins here, here, here and here. Or if you mosey on by the blog tomorrow, I might have another super special cupcake recipe to share with you too!

Baking with B appears every other Monday on the Keeping Busy with B Blog. Find out why I like baking so much here. For more of my baking, click here. And for even more recipe inspiration, check out my Pinterest full of food eye candy that will have you licking your computer. Promise.


Baking with B: Maple Syrup Muffins

BFP MapleMuffins-5787-1000

Let’s be honest with each other here; I’m not that into maple flavor. (Yes, I realize that makes me a bad Canadian.) Give me chocolate, chocolate, chocolate any day. There are times, though, when I have to make an exception and these muffins were meant to break my maple rule. My mom used to make these when I was younger and I’m happy to keep the recipe in my repertoire- they’re not sweet or fake-tasting but full of real, honest-to-goodness mapley flavor that’ll make you want to dig out your best plaid shirt. Aunt Jemima is not invited.

Maple Syrup Muffins

Muffins:

½ c. soft margarine or butter, room temperature

½ c. granulated sugar

1 tsp. salt

1 ½ c. all-purpose flour

¾ c. rolled oats

½ c. milk

½ c. maple syrup

Icing:

1 tbsp butter, room temperature

½ c. sifted icing sugar

3 tbsp maple syrup

Preheat oven to 350F. Grease 12 muffin cups or coat with cooking spray. In a medium-size mixing bowl, beat margarine with sugar and salt until evenly combined. Measure flour, baking powder, and oats into a small mixing bowl. Stir with a fork until well mixed, then stir into margarine mixture. In a measuring cup or small bowl, stir milk with maple syrup. Pour into batter, stirring just until combined.

Immediately spoon batter into muffin cups. Bake in centre at 350F oven until golden and a cake tester inserted into centre of a muffin comes out clean, about 20-23 minutes.

To make icing, stir butter with icing sugar and first tablespoon of maple syrup until smooth. If icing is too thick, stir in additional maple syrup, little by little if needed, until the icing is spreadable but not runny.

B’s Tip: Don’t freak out and think that you’ve made too much icing- you’ll figure out why once you start icing the muffins. The heat lets the icing pool and eventually level and harden- which is why it’s best to eat them super quick!

Remove muffins from oven and let stand for 5 minutes. Spread tops with icing and then remove from pan. Place muffins on a cooling rack. Serve warm. Store muffins in a sealed bag or at room temperature for up to 2 days. For longer storage, refrigerate or preferably freeze.

Happy baking!

B

KBwB-BFlower-50Baking with B appears every other Monday on the Keeping Busy with B Blog. Find out why I like baking so much here. For more of my baking, click here. And for even more recipe inspiration, check out my Pinterest full of food eye candy that will have you licking your computer. Promise.