Baking with B: White Chocolate Fudge Bars

You guys know me and how I’m just a wee bit obsessed with brownies. My love affair started with chocolate, and continued with these butterscotch ones my mom used to make, and evolved so that I adapted the chocolate brownie recipe to suit the dietary needs of my vegan friends. Of course, this hasn’t stopped me from experimenting with even more flavor combinations (maybe I’ll share some more in an upcoming post?) but for now I couldn’t resist trying this chocolate, fudgey variety that taste just as good as they sound.

White Chocolate Fudge Bars (makes 16)

1/2 cup unsalted butter

8oz white chocolate chips (or your favorite white chocolate bar)

3/4 cups granulated sugar

2 eggs

1/2 teaspoon salt

1 teaspoon vanilla extract

1 cup all purpose flour

Preheat oven to 350F. Melt the butter with the white chocolate using a double boiler, by heating it in a glass bowl in the microwave, or by making your own makeshift double boiler.

B’s Tip: To make your own double-boiler, fill a small saucepan a third of the way full with water. Set a bowl on top (not plastic) and make sure it’s big enough to rest on the rim of the pot without fully being immersed in the water at the bottom. Place the butter and white chocolate in the bowl. Bring the saucepan to a boil on the stove. Stir gently and watch the mixture melt like magic!

Add sugar to the butter/chocolate mixture and mix well. Mix in the salt, vanilla, and eggs until incorporated. Stir in flour until well combined. Spread batter into a greased 8″ pan. Bake for 28 minutes. Let cool completely before cutting into squares.
Happy baking!

B

KBwB-BFlower-50

Baking with B appears every other Monday on the Keeping Busy with B Blog. Find out why I like baking so much here. For more of my baking, click here. And for even more recipe inspiration, check out my Pinterest full of food eye candy that will have you licking your computer. Promise.

Baking with B: Cappuccino Cupcakes

BFoodPix-ChocMuff1-031-1500

Don’t be fooled by these tasty little fellas. They’re masquerading as chocolate cupcakes but they’ve taken on a little more of a grown-up flavor. No, there’s no booze in them (although that might be an interesting experiment) but is there espresso powder which probably means they’re not that appropriate for the kiddos. Or maybe you’re baby-sitting and want to return the kids full of sugar and caffeine. In that case, I give you permission to bake away. Nothing goes better with coffee than chocolate anyway.

Cappuccino Cupcakes (makes 24)

1 c. butter

1 3/4 c. sugar

4 large eggs plus 2 large egg yolks

1 tbsp vanilla extract

3 c. cake flour (spooned and leveled)

1 tbsp baking powder

1/2 tsp salt

1/2 c. buttermilk

3 tbsp espresso powder

1 c. semisweet chocolate, finely chopped

Bring cold ingredients to room temperature before starting to mix your batter. Preheat oven to 350F. Grease or line 24 standard muffin cups. In a large bowl, cream together butter and sugar. Beat in eggs and yolks, one at a time, until combined. Beat in vanilla. In another large bowl, whisk together cake flour, baking powder and salt. Add 1/3 c. of the dry ingredients to wet ingredients, beating to combine. Beat in 3/4 c. buttermilk, another 1/3 c. of the flour mixture and alternate between buttermilk and flour mixture until all ingredients are combined. Do not overmix.

In a small bowl, combine espresso powder and 2 tsp hot water. Stir espresso and chopped chocolate into batter and divide among muffin cups. Bake until a toothpick inserted in the center comes out clean, about 20 minutes, rotating halfway through. Let cool in pans first, about 5 minutes before transferring to racks.

B’s Tip: You can use whichever icing recipe you like, but my particular favorite for this recipe is just straight up chocolate. For an extra caffeine kick, you may want to try mixing it in with extra coffee or espresso.

Happy baking!

B

KBwB-Flower-50


Baking with B (usually) appears every other Monday on the blog. I just love cupcakes though, which is why I’m feeling extra generous this week. Find proof on just how crazy I am about cupcakes here. Find out why I like baking so much here. For more of my baking, click here. And for even more recipe inspiration, check out my Pinterest full of food eye candy that will have you licking your computer. Promise.

Making cupcakes for a crowd? Never fear. I shared my method on how do it here. Want more cupcake recipes? I’ve got some delicious ones here.

Cupcakes for the Masses

7BFP-SpringCupcake-SQ1000-05
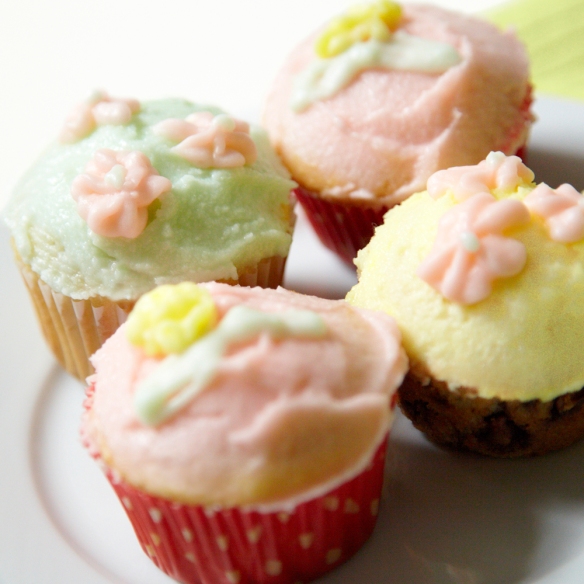
There was another birthday party at the office. Guess what happened. This.

The request this time was for cupcakes, of all flavors, and after I briefly considered opening a bakery, I decided the only way to approach this task was to make it as efficient and simple as possible. (Who says you can’t mix productivity and baking?) See, I’m a not a professional cake decorator or baker (although sometimes I pretend to be when I break out my cake decorating kit with all of the fancy icing tips) and although I do enjoy having people over for coffee or brunch, I’m not really accustomed to making things for a large group of people, let alone bake and decorate cupcakes en masse.

So maybe I cheated a little bit and made a giant batch of my favorite vanilla cupcake recipe (which you can find here and multiply according to your needs). Despite the numerous (and extremely varied) requests I received, I decided to narrow down my flavors to three classic options: plain vanilla, chocolate chip and butterscotch chip. Oh, and they were all going to have buttercream icing too. Ba-bam. Who could argue with that?

Once my batter was mixed, I divided into three separate mixing bowls. I left one batch plain and stirred in 1 c. of chocolate chips into one, and 1 c. of butterscotch chips into another, stirring gently to mix. I baked them according to the instructions here and left them on a rack to cool completely before decorating.

To “color-code” all of the flavors, I found three different patterns of muffin cups and decided to coordinate them with three different colors of frosting to further increase the recognition. Making several colors of frosting can be labor-intensive but luckily isn’t too difficult once you’ve made yourself a big batch of icing and separate it accordingly. I never worry about making too much icing- it’s always handy to have some extra on-hand to clean up mistakes. In my case, having too much icing was a little bit of a happy accident- I wasn’t initially going to draw flowers but I couldn’t resist using up the rest of those sweet spring colors.

It feels silly to admit it now, but baking such a large amount of cupcakes was a (needlessly) intimidating experience for me. Despite the fact that they were not among my best or most exciting baking adventures, they were definitely one of the simplest and weren’t any less tasty. It was worth it to see the look on everyone’s face when I brought a giant plate of them out into the waiting room. It reminds me that I bake for my own enjoyment and for others; my baking is for sharing, and not for impressing other people.

Besides, sharing is totally calorie-free.

KBwB-BFlower-50

Why just stick with baking a big ol’ batch of vanilla? If you’re the mood to change things up a little bit, I’ve baked chocolate cupcakes, banana cupcakes and a whole whack-load of muffins here, here, here and here. Or if you mosey on by the blog tomorrow, I might have another super special cupcake recipe to share with you too!

Baking with B appears every other Monday on the Keeping Busy with B Blog. Find out why I like baking so much here. For more of my baking, click here. And for even more recipe inspiration, check out my Pinterest full of food eye candy that will have you licking your computer. Promise.


Baking with B: Blueberry Cake with Lemon-Yogurt Drizzle

BFoodPix-Blueberrycake-09
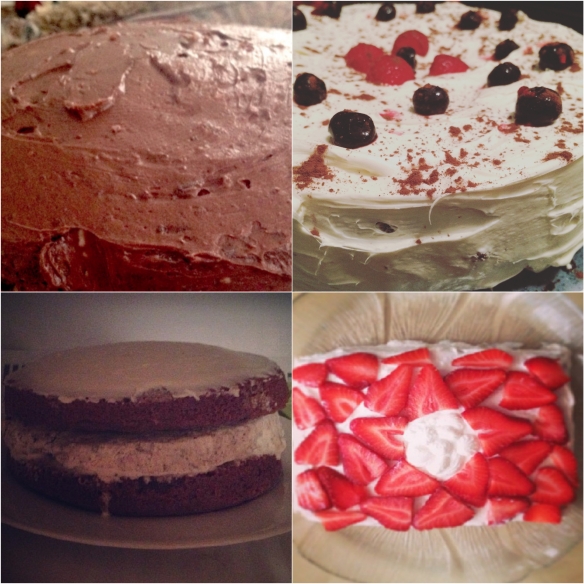
I bet y’all want to know what I baked for Easter. It was never an elaborate affair in my household growing up, but now that I’m older and live on my own there’s something nice about having an excuse to have family members over for brunch. This past year the victim was my dad, and he claimed to love the quiche that I made him, although personally I think he liked this cake even more. Don’t tell him- the cake was ten times easier to make!

Blueberry Cake with Lemon-Yogurt Drizzle (serves 8)

Cake

Use your favorite vanilla cake recipe, your favorite pre-packaged mix, or the recipe for my classic vanilla cupcakes here. (Yes! They work in cake format as well.)

Filling

3/4 c. blueberry pie filling

Drizzle

1/3 c. Greek yogurt, plain

6 tbsp icing sugar

lemon juice, to taste

Preheat oven to 325F, then prep your vanilla cake batter. (You can use whichever recipe you’d like, although I highly recommend the one posted here. I may or may not be a little biased.) Grease 2 8-inch round cake pans and bake according to your recipe (approximately 25 minutes or so, or until a knife inserted in the middle comes out clean). Let cakes stand in pan for ten minutes or so to cool before transferring them onto a wire rack.

B’s Tip: You must let both layers cool completely before assembling. Trust me on this one- you’re going to end up ladling out portions of your cake with a spoon if you don’t!

Transfer one cake onto a large serving dish or platter. Generously spread blueberry pie filling over top, taking care to leave approximately half an inch border around the perimeter so all the blueberry goodness doesn’t squirt out. Gently sandwich the second cake overtop of the first one. You may wish to add more blueberry filling to your middle layer by spreading more filling along the side of your cake using the tip of your knife.

In a small mixing bowl, whisk together yogurt and icing sugar until a paste is formed. Add lemon juice as desired (if you’re using flavored yogurt, you may want to leave it as-is). Whisk until mixture is thick and runny, but still opaque. Let stand approximately 10 minutes and mix once more before drizzling over your cake in your favorite pattern, or spread using a flat knife or spatula for a more coated look.

I love the flavors of blueberry and lemon together, but this cake is so simple it’s easy to change out the blueberries for another favorite fruit filling. You may want to experiment with different flavors of yogurt, or another fruit juice to make another killer combo that will have people scratching their heads, wondering how you came up with such an awesome recipe. (Don’t worry- my lips are sealed.)

KBwB-BFlower-50Baking with B appears every other Monday (usually!) on the Keeping Busy with B Blog. Find out why I like baking so much here. For more of my baking, click here. And for even more recipe inspiration, check out my Pinterest full of food eye candy that will have you licking your computer. Promise.

Baking with B: The Deconstructed Peanut Butter Cookie

BFoodPix-PBCookies-1500

Oh man. My mom used to make these all the time when I was little. I hadn’t had them in forever, and then there was all this peanut butter in the house- needless to say, revisiting this recipe was long overdue.

Lately, I’ve been reading so many recipes that are junked-up versions of old favorites which is why I call this the “deconstructed” version of a peanut butter cookie. It’s just that- three ingredients, plain and simple, not too sweet and super peanut-y good.

The Deconstructed Peanut Butter Cookie (makes 24)

1 c. unsweetened, smooth peanut butter

1/2 c. brown sugar

1 egg, beaten

Preheat oven to 325F. In a medium bowl, cream sugar and peanut butter until well blended. Mix in egg until batter starts forming a smooth, sticky ball. Scooping out portions by the spoonful, roll batter into balls and place approximately 2 inches apart on tray. Flatten with criss-cross patterns using the tines of a fork.

B’s Tip: To make sure you have a clean criss-cross pattern, have a glass of cold water handy so that when your fork gets too sticky you can dip it in and clean away some of the excess.

Bake for 15 minutes. Do not overbake. Cookies will look soft and puffy when they first come out of the oven, but will harden once you leave to cool on the baking tray for 5 minutes. Remove to wire racks and let cool completely before serving.

Now just because I call this the “deconstructed” peanut butter cookie doesn’t mean you can’t make of the recipe what you will. You may want to experiment with different flavors of nuts, or adding chocolate or butterscotch chips for a hint of sweetness. Or why not try something daring, like mixing in dried fruit, shredded coconut, or broken pretzel pieces? These cookies are super crumbly and buttery and would also taste great by themselves sprinkled over ice cream, or even on top of a cake.

Who says you can’t play with your food?

KBwB-BFlower-50

Baking with B appears every other Monday on the Keeping Busy with B Blog. Find out why I like baking so much here. For more of my baking, click here. And for even more recipe inspiration, check out my Pinterest full of food eye candy that will have you licking your computer. Promise.

Baking with B: Classic Pecan Pie

I have this theory that we date the same people over and over again. Some attribute this phenomenon to a psychological need to look for partners that emulate our parents, but I’m convinced that there are also certain things that attract us to certain people, and make us attractive to others in turn. For example, I inexplicably keep on finding these guys who list pecan pie at the top of their favorite desserts and it is for this reason that I have made this pie more than any other. Go figure.

Classic Pecan Pie

3 eggs, slightly beaten

1/2 c. brown or white sugar

1/4 tsp salt

1 c. light corn syrup

1/2 tsp vanilla

1 c. pecans, broken in pieces

Set the oven at 450F. Line a 9″ pie pan with your preferred kind of pastry (I have a recipe on how to make a traditional pie crust here; however, for this recipe I would recommend using something more like a pressed graham-cracker crust. You can make it yourself or find them pre-packaged at the grocery store.) Mix ingredients and pour into pan. Bake for 10 minutes. Reduce heat to 350F and bake 35 minutes longer. Chill. Serve with whipped cream and halved pecans for garnish. (Because yum.)

Happy baking!

B

KBwB-BFlower-50

Baking with B appears every other Monday on the Keeping Busy with B Blog. Find out why I like baking so much here. For more of my baking, click here. And for even more recipe inspiration, check out my Pinterest full of food eye candy that will have you licking your computer. Promise.

Baking with B: Maple Syrup Muffins

BFP MapleMuffins-5787-1000

Let’s be honest with each other here; I’m not that into maple flavor. (Yes, I realize that makes me a bad Canadian.) Give me chocolate, chocolate, chocolate any day. There are times, though, when I have to make an exception and these muffins were meant to break my maple rule. My mom used to make these when I was younger and I’m happy to keep the recipe in my repertoire- they’re not sweet or fake-tasting but full of real, honest-to-goodness mapley flavor that’ll make you want to dig out your best plaid shirt. Aunt Jemima is not invited.

Maple Syrup Muffins

Muffins:

½ c. soft margarine or butter, room temperature

½ c. granulated sugar

1 tsp. salt

1 ½ c. all-purpose flour

¾ c. rolled oats

½ c. milk

½ c. maple syrup

Icing:

1 tbsp butter, room temperature

½ c. sifted icing sugar

3 tbsp maple syrup

Preheat oven to 350F. Grease 12 muffin cups or coat with cooking spray. In a medium-size mixing bowl, beat margarine with sugar and salt until evenly combined. Measure flour, baking powder, and oats into a small mixing bowl. Stir with a fork until well mixed, then stir into margarine mixture. In a measuring cup or small bowl, stir milk with maple syrup. Pour into batter, stirring just until combined.

Immediately spoon batter into muffin cups. Bake in centre at 350F oven until golden and a cake tester inserted into centre of a muffin comes out clean, about 20-23 minutes.

To make icing, stir butter with icing sugar and first tablespoon of maple syrup until smooth. If icing is too thick, stir in additional maple syrup, little by little if needed, until the icing is spreadable but not runny.

B’s Tip: Don’t freak out and think that you’ve made too much icing- you’ll figure out why once you start icing the muffins. The heat lets the icing pool and eventually level and harden- which is why it’s best to eat them super quick!

Remove muffins from oven and let stand for 5 minutes. Spread tops with icing and then remove from pan. Place muffins on a cooling rack. Serve warm. Store muffins in a sealed bag or at room temperature for up to 2 days. For longer storage, refrigerate or preferably freeze.

Happy baking!

B

KBwB-BFlower-50Baking with B appears every other Monday on the Keeping Busy with B Blog. Find out why I like baking so much here. For more of my baking, click here. And for even more recipe inspiration, check out my Pinterest full of food eye candy that will have you licking your computer. Promise.

A Cacophony of Cakes

KBB_cacophony_of_cakes

Whew. It’s been a busy few weeks for me.

Right after Christmas comes a whole whack-load of birthdays in my social circle which inevitably means a lot of parties, cards, and in my case, baking. I used to be really into making birthday cakes for people, and it was actually some friends and co-workers who suggested that I start blogging about the baking I do in my spare time.

When I mean that I was really into it, I mean I started making lists of people’s favourite cakes because, why not? It was fun and thoughtful to shower attention like that on someone, and it was an exciting opportunity for me to try a new recipe. (Kind of like how I totally made one up on the fly here.)

But something kind of…happened along the way. I don’t know what it was. Maybe I was tired from the sheer effort of turning out birthday cakes all the time. Maybe it had started to feel like a chore. But I stopped doing it for a long while. I told myself that it was too much trouble, and no one really appreciated it anyway.

This recent bevy of birthdays, however, made me reconsider my cake hiatus and after much cajoling from my co-workers I ended up making a key lime pie (my boss’ favorite) for our office lunch for his birthday.

KBB_key_lime_pie

I was pretty nervous for two reasons: one, I hadn’t made a pie in a while, let alone a cake. Two: I may have felt a teensy need to impress my boss. This was starting to feel like a pretty momentous occasion in my amateur baking career.

Not going to lie: it was a little bit of a disaster. A key lime pie doesn’t travel well if you’re walking to work, and storing it in an office mini-fridge (as I have discovered) is a big no-no. The results were drippy, and not at all pretty. But all of the office unanimously declared it was delicious, even poor Lucy who told me she had choked back every bite (she doesn’t like lime-flavored anything).

Not every recipe will turn out perfectly every time and that’s just a fact of life. But this enormous pressure I had put on myself to be this picture-perfect Pinterest chef had taken away the enjoyment of baking. I was baking because I felt like I had a set a precedent of always being the girl who baked the cakes. I had lost sight of why I love baking in the first place- to share good food with people I love. (It’s also a big stress reliever. Did I mention that?)

In the end I discovered that decision whether or not to bake something had always been my choice. The moment I felt more in control was the moment I felt the urge to do it again. Sure, this time I only dipped my toe in by making a key lime pie, and not a cake. But spring is coming, and there are a lot more birthdays coming up. Another colleague has already put in a request for his birthday.

The best part is that I’m enjoying it again. I’m doing something that I love not because I’m an excellent baker, but because it’s something that I do for myself.

I just use other people’s birthdays as an excuse.

KBwB-BFlower-50

Feeling inspired to start baking again? Here are some recipes to get you started. You’re welcome. I still can’t stopping pinning recipes to Pinterest, though, despite my efforts to be easier on myself and take my baking less seriously.

Cakes pictured above are (from top left): Lucy’s Chocolate Chocolate Cake; Chocolate Berry Cake (featured on Instagram); Cookies and Cream Ice Cream Cake; Shannon’s Strawberry Cake and Key Lime Pie (not featured).


Baking with B: Date Squares

IMG_0440

Let’s make a date, shall we, for some mid-winter treats that serve up a nice hit of sweetness without being too unhealthy. When you combine dates with oats and pecans it’s practically like granola, which means I’m totally allowed to eat these for breakfast, right? Right? I dare you not to eat them as a meal, either.

Date Squares (serves 12)

1 1/2 c. chopped, pitted dates

1/4 c. granulated sugar

1 c. orange juice

1 tsp grated orange zest

1 1/4 c. quick-cooking oats

1 c. all-purpose flour

3/4 c. packed brown sugar

1/4 c. chopped toasted pecans

1 tsp ground cinnamon

1/2 c. vegetable oil

1/4 c. water

Preheat the oven to 350F. Combine dates, sugar and orange juice in a saucepan and bring to a boil. Reduce heat to medium and let simmer for 15 minutes, or until the dates are soft and the liquid is absorbed. Mash the mixture and set aside to cool. Meanwhile, combine orange zest, oats, flour, brown sugar, pecans, cinnamon, oil and water in a bowl until combined. Pat half of the mixture onto the bottom of a greased 8″ square baking dish. Spread the cooled date mixture over top. Sprinkle the remaining oat mixture on top of the dates for the third layer. Bake in center of the oven for 25 minutes or until squares are golden. Cool before serving.

B’s Tip: Who doesn’t like pecans? Ok, maybe you’re actually one of these crazy people that doesn’t. This recipe can still be salvaged. I’d be willing to substitute for walnuts, or maybe almonds. It’s too hard to decide! Your squares, your choice, and let me know how it works for you.

Happy baking!

B

KBwB-BFlower-50Baking with B appears every other Monday on the Keeping Busy with B Blog. Find out why I like baking so much here. For more of my baking, click here. And for even more recipe inspiration, check out my Pinterest full of food eye candy that will have you licking your computer. Promise.


Baking with B: Vegan Brownies

Chopped Chocolate

With so many friends becoming health-conscious recently, I just had to dig out this old favourite from my high school days. We had one vegan in our group of friends and it became a tradition to bring cruelty-free treats to every party he attended. Plus, all the fruit in them makes me feel a whole less guilty about eating them because they’re healthier, right? At least that’s what I tell myself so I can sleep easier at night.

Vegan Brownies

10 oz. applesauce (bonus points if you have some homemade!)

8 oz. cocoa powder or baking chocolate, melted

¼ tsp salt

2 c. sugar

1 banana

1 1/3 c. flour

2 c. chocolate chips (approximately)

Beat the above with a fork until smooth. Pour into a square 8×8” pan for traditional square brownies. Bake at 350F for 35 minutes.

B’s Tip: Not all chocolate chips are created equally! Make sure you use chocolate chips that don’t contain any milk or milk by-products to make this recipe as vegan-friendly as possible. There are also plenty of other vegan, health-conscious substitutions out there such as cocoa nibs that would also probably taste really great, especially because the sugar content of these babies is already so high.

Unlike these chocolate brownies that I usually make, these ones have a slightly fruity flavor and are very moist and sticky. I’m looking forward to enjoying them with my favorite new vegan discovery- ice cream that’s made from coconut milk. I’ll update you as soon as I’ve tried one. Or two. Or five.

Happy baking!

B

KBwB-Flower-50

Baking with B appears every other Monday on the Keeping Busy with B Blog. Find out why I like baking so much here. For more of my baking, click here. And for even more recipe inspiration, check out my Pinterest full of food eye candy that will have you licking your computer. Promise.