Let Them Eat Cake!

If Marie Antoinette and I have anything in common, it’s that we both love our cake. There’s something so satisfying about embarking on a big, elaborate recipe and once I’m done baking I’m always left with the feeling on having accomplished something. Cake makes me feel good even before the eating part!

Sweet Spell (who nominated me for the One Lovely Blog Award) asked me to participate in a link-up party this week featuring some of the best cakes around the blogosphere. My Honey Mandarin Orange Cake is in there (perfect if you’re experiencing if you’re feeling blue about the colder weather). These fine bloggers have some great cake recipes as well:

sweet-spell-date-cake

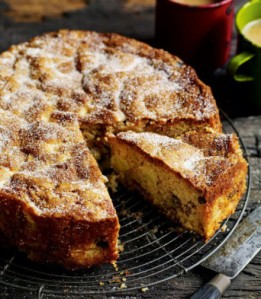
Sweet Spell made this decadent looking Date Cake that looks like it would go perfectly with your morning coffee.

cooking-without-limits-date-cakeI’ve been following the blog Cooking without Limits for a while and this Pear Cake is still one of my favorites. The inside is just stunning!

chiaras-baking-buckwheat-cake

Chiara writes in both English and Italian on her cooking blog Chiara’s Baking and her Buckwheat Cake with Jam is simple, sweet and classic to Italy.

good-life-paradise-cake

Paradise Cake sounds just like that- paradise- and the recipe for it can be found over on the blog Searching for the Good Life.

foodie-on-board-chia-cakeFinally, Foodie on Board has baked the most beautiful Orange and Chia Seed Cake with Sugared Rosemary. I bet you can’t even taste how healthy it is!

Many thanks to Sweet Spell for rounding up all of these great recipes (and great bloggers!) If you’d like to participate in a future link-up party as well give me a shout at keepingbusyb@gmail.com. I always love to hear from and/or drool over your baking pictures!

KBwB-BFlower-50

Original baking party post found here. Find out why I like baking so much here. For more of my baking, click here. My column Baking with B usually appears every other Monday on the Keeping Busy with B Blog. I hope you’ll join me for the next one!

Baking with B: Pretzel Shortbread Bars

16bfp-prtzlshrtbrd-1500

There’s just something about the combination of salty and sweet that’s just so addictive; I can’t describe it. I’m not really into anything like chocolate-covered potato chips (my tastes often veer towards the traditional) but anything that involves salted caramel, or anything like these tasty bars below is totally my jam. Or my salt. Or whatever.

Pretzel-Shortbread Bars (makes about 2 dozen)

3 1/4 cups salted miniature twist pretzels

1/2 cup all-purpose flour

1/2 teaspoon baking powder

1/2 c. unsalted butter, room temperature

1/2 cup sugar

1 large egg yolk

Preheat oven to 325F. While it’s pre-heating, pulse 1 ¾ c. pretzels in a food processor until powdery. Transfer 1/2 cup to a bowl; discard any remaining pretzel powder. Stir in flour and baking powder. Transfer remaining 1 1/2 cups pretzels to food processor, and pulse a few times until coarsely chopped.

B’s Tip: Don’t have a food processor? Do it the old-fashioned way like I did and crush the pretzels a handful at time by placing them in a sealed Ziploc bag and grinding them down with a potato masher. To make the powder, strain crushed pretzels through a sieve. Just return any remaining pretzel pieces to the bag and repeat the process until you have enough pretzel powder to mix in with your flour.

In a separate bowl, beat butter and sugar until pale and fluffy. Beat in egg yolk, then pretzel-flour mixture, bit by bit until well combined. Mix in 1/2 cup chopped pretzels. Grease a 4 1/4-by-13 1/2-inch fluted tart pan or pie plate and line the bottom with parchment. Press dough evenly into pan and top dough with 1/4 cup chopped pretzels, pressing slightly. Discard any remaining pretzels. Bake until pale brown and firm in the center, 25 to 30 minutes. Transfer pan to a wire rack, and let shortbread cool for 1 hour. Remove shortbread from pan, and cut into 1/2-inch-wide rectangles using a serrated knife.

B’s Tip: If you’re super organized and want to get things done ahead of time you can store these babies at room temperature for up to one week.

I have to admit- this was my first time making shortbread and it actually ended up being way easier than I thought. Sure, this recipe requires a fair amount of assembling, but the most difficult part was keeping them out of my mouth long enough to let my photographer shoot them for the blog!

Happy baking!

B

KBwB-BFlower-50

Baking with B appears every other Monday on the Keeping Busy with B Blog. Find out why I like baking so much here. For more of my baking, click here. And for even more recipe inspiration, check out my Pinterest full of food eye candy that will have you licking your computer. Promise.

Baking with B: Peanut Butter and Jelly Cupcakes

15bfp-pbjcupcakes-1500

My childhood home was within walking distance of my elementary school and because my parents ran their own business they were often around during the day and I was lucky enough to go home during the lunch hour and decompress before heading back to class for the afternoon. This lasted all the way through high school, so I consider myself pretty lucky to skipped the ritual of navigating the cafeteria and its famously terrible food throughout most of my grade school career.

Seeing all the kids going back to school made me a little nostalgic for ye olden days, so I decided to make these cupcakes reminiscent of everyone’s favorite childhood sandwich. (I realize this assertion dates me but give me a break here- when I was younger we had zero peanut butter allergies in our school and these would have totally been allowed.)

Peanut Butter and Jelly Cupcakes (makes 18)

Cupcakes
1 3/4 c. all-purpose flour
3/4 tsp. baking powder
1/2 tsp. salt
1/4 tsp. baking soda
6 oz. (1 1/2 sticks) unsalted butter, softened
1 1/3 c. sugar
2/3 c. smooth peanut butter
3 large eggs
1/2 c. sour cream
1/2 tsp. pure vanilla extract
strawberry jam, for topping

Frosting (makes about 3 c.)

6 oz. cream cheese
1/3 c. icing sugar
1/2 tsp. salt
1 c. smooth peanut butter
1/2 tsp. pure vanilla extract
1/2 c. whipping cream

Preheat oven to 350F. Cream together butter and sugar in medium-sized bowl. Add peanut butter, eggs, sour cream, and vanilla (in that order, thank you very much) and mix well. In a separate bowl, sift together dry ingredients. Mix in with wet ingredients gradually until well-combined.

Grease muffin pan or line with liners and use a spoon or an ice cream scoop to fill each cup 3/4 full. Bake for 20 minutes or until tops spring back to the touch. Place on a rack on cool completely before icing.

B’s Tip: You can make the frosting ahead of time as it keeps for up to 2 days in the fridge. Just bring it to room temperature and mix until smooth to get it all spreadable again.

To make the frosting, cream icing sugar and cream cheese together in a medium-sized bowl. Add salt, and mix in gradually the peanut butter, then the vanilla. Whisk cream in a separate bowl until soft peaks form, then fold into peanut butter mixture. Frost cupcakes and decorate each with a dollop of jam in center. Decorated cupcakes will last in the fridge, covered, for up to 2 days.

B’s Tip: If you’re using a jam with a lot of whole berries in it, make sure to macerate any larger chunks of fruit before decorating. Trust me, it makes the whole dolloping experience way easier.


These cupcakes are surprisingly moist and cake-y and probably are just as great for you as the sandwiches were. So why not call a spade, a spade, and eat your PB and J in cupcake format? The consensus is that strawberry jelly is the way to go, but my personal favorite is raspberry. What’s your jam? (See what I did there?)

KBwB-BFlower-50Baking with B appears every other Monday on the Keeping Busy with B Blog. Find out why I like baking so much here. For more of my baking, click here. And for even more recipe inspiration, check out my Pinterest full of food eye candy that will have you licking your computer. Promise.

Baking with B: S’mores Squares

14BFP-SmoresBars-1500

I have to admit- the other day I was feeling a little nostalgic about the end of summer. There’s something ominous in those cool August nights- a promise of the weather yet to come that somehow serves as a reminder of all the stuff you didn’t get to experience or enjoy over the past season.

And I definitely have not enjoyed the quintessential outdoor dessert, s’mores, in awhile.

S’mores just aren’t the same when you’re not camping, so the next best thing is making your own deconstructed version that come out more homemade chocolate bars instead of gooey treats. Think of all of the possibilities of the places you can take these babies once you get rid of the oozy, marshmallow-y factor- to the park, to the beach, in the car. (Maybe don’t leave them in the direct sunlight.) S’mores lovers fear no more- they are no longer confined to the campfire. You’re welcome.

S’mores Squares (makes 1 9 x 12-1/2-inch sheet or six 2-1/2 x 5-inch bars)

600g (approximately 1-1/2 lbs.) milk chocolate chips, melted

1 pkg graham crackers

2 c. mini marshmallows

Line a 9×12-1/2-inch rimmed baking sheet or 6 small loaf pans (2-1/2×5-inch) with plastic wrap, and cover the bottom with graham crackers to form a layer. (I used a loaf pan to get a thick, dense square). Reserve remaining crackers. Pour the melted chocolate onto the graham cracker layer, and spread until even and smooth. Sprinkle with mini marshmallows and crumble remaining graham crackers off of top. Refrigerate until firm, at least 1 hour. Peel off the plastic wrap and break into pieces to serve. Keeps in the fridge for one week (if you can resist the temptation to eat them!)

If you’re feeling schmancy (like I was), you can experiment with the flavors and the presentation. I toasted my marshmallows ever so slightly before adding them, and I set some of the melted chocolate to drizzle over top. But don’t let me stop you there- add more toppings like your favorite nuts, dried fruit, or shredded coconut if you want to junk it up. Or if you’re a chocolate lover, you may want to try experimenting with different kinds of chocolate, or flavors of candy bars.

Me, I’m a s’mores purist, and I’ll take these squares as is.

Happy baking!

B

KBwB-BFlower-50

Baking with B appears every other Monday on the Keeping Busy with B Blog. Find out why I like baking so much here. For more of my baking, click here. And for even more recipe inspiration, check out my Pinterest full of food eye candy that will have you licking your computer. Promise.

Baking with B: Peach Cobbler

13BFP-PeachCobbler-1500

Let’s just all agree on one thing: peaches are the best. Sure, they’re great any time of year but when they’re in season there’s no way I’m going to junk up the flavor of a fresh peach by hiding it in some cake or square. No, I want my peaches sweet and juicy and I want them now in this cobbler, showcased just the way they were meant to be.

Peach Cobbler

8 fresh peaches – peeled, pitted and sliced into thin wedges

1/4 cup white sugar

1/4 cup brown sugar

1/4 teaspoon ground cinnamon

1/8 teaspoon ground nutmeg

1 teaspoon fresh lemon juice

2 teaspoons cornstarch

1 cup all-purpose flour

1/4 cup white sugar

1/4 cup brown sugar

1 teaspoon baking powder

1/2 teaspoon salt

6 tablespoons unsalted butter, chilled and cut into small pieces

1/4 cup boiling water

For the topping:

3 tablespoons white sugar

1 teaspoon ground cinnamon

Preheat oven to 425F. In a large bowl, combine peaches, 1/4 cup white sugar, 1/4 cup brown sugar, 1/4 teaspoon cinnamon, nutmeg, lemon juice, and cornstarch. Toss to coat evenly, and pour into a 2 quart baking dish. Bake in preheated oven for 10 minutes. Meanwhile, in a large bowl, combine flour, 1/4 cup white sugar, 1/4 cup brown sugar, baking powder, and salt. Blend in butter with your fingertips, or a pastry blender, until mixture resembles coarse meal. Stir in water until just combined. Remove peaches from oven, and drop spoonfuls of topping over them. Sprinkle entire cobbler with the sugar and cinnamon mixture. Bake until topping is golden, about 30 minutes.

Happy Baking!

B

KBwB-BFlower-50Baking with B appears every other Monday on the Keeping Busy with B Blog. Find out why I like baking so much here. For more of my baking, click here. And for even more recipe inspiration, check out my Pinterest full of food eye candy that will have you licking your computer. Promise.

Baking with B: Zucchini Bread

This recipe brings back fond memories of the summer when I was eleven years old, and my family used to trek up to this old farmhouse outside of Toronto that was owned by some friends of ours.

Remember when you were a kid summer used to feel like it went on for years and years? That’s how it felt up at this farmhouse. My little sister and I used to float on our backs in the pool for hours, explored the neighboring cornfield and ran shrieking and laughing through the farmhouse’s ramshackle rooms.

And the zucchini bread. Oh, the zucchini bread. We gobbled this like it was banana bread, because it’s honestly so nutty and sweet and good you don’t even realize you’re eating zucchini. Then it was too late to protest when we served zucchini at dinner, because of course we ate it- it was in the bread- and thus began my love for zucchini, and this recipe which I have made over and over again since then.

Even my dad loved it. I still don’t think he figured out he was eating vegetables.

Zucchini Bread (makes one loaf)

1 ½ c. all-purpose flour

1 ½ c. whole-wheat flour

1 tsp baking soda

1 tsp baking powder

½ tsp cinnamon

1 ½ tsp nutmeg

1 tsp salt

½ c. raisins

3 eggs

1 c. oil

1 tbsp vanilla

1 ½ c. brown sugar

2 c. grated zucchini (about two small ones)

In a medium bowl, mix together flours, baking soda, baking powder, cinnamon, nutmeg and salt. Add in raisins and eggs. Beat until light and fluffy. Add oil, vanilla and brown sugar and stir well. Add zucchini last. Pour into greased 9×5 loaf pan. Bake at 350F for 45-60 minutes.

Happy baking!

B

KBwB-Flower-50

Baking with B appears every other Monday on the Keeping Busy with B Blog. Find out why I like baking so much here. For more of my baking, click here. And for even more recipe inspiration, check out my Pinterest full of food eye candy that will have you licking your computer. Promise.


Baking with B: Honey Mandarin Orange Cake

12BFP-OrangeCake-825

You know those moments where you just feel like baking something, and you kind of don’t want to grocery shopping, and you start hunting around in your kitchen cupboards for something- anything- that might give you inspiration?

Yeah. I had one of those moments this past weekend.

Lucky for me there was a tin of mandarin oranges lurking at the back of one of my shelves. It screamed to be used, so after a quick Internet search (and a search around my kitchen), I came up with my own version of the recipe originally found here.

The result? Sunshine in a pan. It’s dense and moist and actually not that sweet, so if you feel like it deserves some icing, I won’t stop you. Or make it many times over and tell me which way you like it best. I know I’m planning on it!

Honey Mandarin Orange Cake (serves 8-10)

1 c. butter, softened

3/4 c. liquid honey

4 eggs

3 c. flour

2 tsp baking powder

1/2 tsp salt

1 can mandarin oranges (about 234g, or 8.2 oz.)

1/2 c. vanilla yogurt

2 tbsp orange zest

Preheat your oven to 350F. In large bowl, cream together butter and honey. (B’s Tip: This will be scary and lumpy but it’s totally ok- it will work out fine. Trust me.) Add eggs and mix until fully incorporated. In a second bowl, mix together flour, baking power and salt. Slowly add to the wet ingredients until fully incorporated.

Strain juice from tin of mandarins reserving both juice and mandarins. Add juice to the batter, as well as the yogurt. Mix until well incorporated. Macerate remaining mandarin slices with fork and add to batter along with orange zest.

Pour batter into a greased 8-inch round pan and bake for 1 hour until top is golden and a toothpick in the center comes out clean. Let stand in pan for 10 minutes before transferring to a wire rack to cool.

I can’t even begin to imagine all the ways you can add to this recipe, or the ways in which you could serve it. It would be great with ice cream or yogurt over top, or make your own icing and have fun adding other citrus flavors like pineapple, or mango. With a summery fun cake like this, anything goes!

Happy baking!

B

KBwB-BFlower-50

Update: I’m so honored that the folks over at the Easy Recipes blog made their own version of the cake here. It’s a great resource for converting any recipe into the measurement of your choice. And they didn’t even pay me to say that.

Baking with B appears every other Monday on the Keeping Busy with B Blog. Find out why I like baking so much here. For more of my baking, click here. And for even more recipe inspiration, check out my Pinterest full of food eye candy that will have you licking your computer. Promise.

Classic Oatmeal Cookies for the Photographer

BFoodPix-OatmealCookie-39

I’ve been acting kind of like a spaz lately, and my photographer has been really good about it. (If you dig what he did here, here, here, here, here and here then I highly recommend him for your own project! He’s available for hire here.) He’s also really appreciative of my baking and inevitably ends up eating some of what he shoots for me. So when it was time to make something for another post and he asked me what I was baking I had been feeling kind of listless, and I shot back out, “Oh, whatever you want!”

Readers, he took me literally.

And it actually ended up being a fun experiment. His request was oatmeal cookies like the kind that his mom used to make-crunchy on the outside, chewy on the inside, and so addictive you have to eat them by the handful.

It was a tall order because I realized I had never actually made oatmeal cookies; like straight-up, honest-to-goodness oatmeal cookies. I was a little nervous (especially after the first batch came out a little too crisp) but once I perfected the baking time these were the perfect consistency. They’re not too sweet but they’ve got the slightest salty bite that makes them mouth-watering.

My photographer gave them two thumbs up. Then he took the lovely picture you see above. I’m not sure which he enjoyed more- shooting the cookies or eating them.

Classic Oatmeal Cookies (makes 48)
(adapted from here)

1 c. butter, softened

1 c. white sugar

1 c. packed brown sugar

2 eggs, slightly beaten

2 c. all-purpose flour

1 tsp baking soda

1 tsp salt

1 1/2 tsp ground cinnamon

3 c. quick cooking oats

In a medium-sized bowl, cream together butter and both sugars. Add eggs and stir. In a separate bowl, combine flour, baking soda, salt and cinnamon and add to wet ingredients, a little bit at a time, until fully combined. Mix in oats. Cover and let chill for at least one hour.

Preheat the oven to 375F. Roll dough into balls roughly the size of walnuts, and place 2 inches apart on pre-greased cookie sheets. Use a fork to gently flatten each cookie. Bake for 8-10 minutes before transferring to a wire rack to cool.

B’s Tip: If you prefer a chewier oatmeal cookie, bake for only 8 minutes and transfer to wire rack while still hot. Use a clean spatula and be careful- they may still be puffy and a little fragile!

The best part about adding yet another basic recipe to my repertoire is a chance to make it my own, and I’m already thinking about my next batch now that I’ve perfected my technique. Dried fruits, nuts, chocolate chips; or maybe all of the above. These cookies would taste good no matter what.

Happy baking!

B

KBwB-BFlower-50

Baking with B appears every other Monday on the Keeping Busy with B Blog. Find out why I like baking so much here. For more of my baking, click here. And for even more recipe inspiration, check out my Pinterest full of food eye candy that will have you licking your computer. Promise.

Come Fika With Me

KBB_fikaEver since I was a little girl, I have enjoyed the Swedish practice of “fika” (explained so wonderfully and succinctly in the meme above). Similar to English “high tea”, “fika” is a perfect excuse to a take a restorative break from our busy day and enjoy a cup of coffee and maybe even a little treat.

My Swedish mother got me started on the practice early. (I’m pretty sure the first appliance I learned how to use in our kitchen was the coffeemaker. Now there’s strategic parenting for you!) Both of my parents worked from home and it wasn’t unusual to put on a pot of coffee in the afternoon and have the members of my family slowly drift into the kitchen once the small wafted through the house. My mother baked often and there would always be something sweet stashed somewhere in the kitchen. She taught my sister and I the basics of baking at an early age and I still have her chocolate brownie recipe memorized (it also happens to be the first baked good I ever shared on this blog here).

I definitely think that my love of fika has fostered my love of baking and I love sharing my baking with you online almost as much as I do sharing it in real life. Come and join my fika party by trying one (or more!) of my favorite recipes here, or share your favorite recipes or fika ideas by commenting below or emailing at me at keepingbusyb@gmail.com

KBwB-PageBreak-35

Baking with B: Best-Ever Bran Muffins

KBB_baking_bran_muffins 
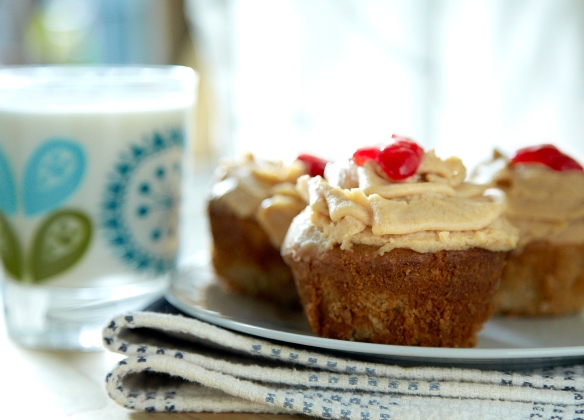
Days like these when the sun is bright and the weather is warm it’s too tempting to go outside instead of staying indoors and doing something boring like eating breakfasts. In the mornings when I’m feeling like I want to go, go, go it’s great to have these around to take to the library, to work or even for a snack on a particularly long dog walk. Don’t limit yourself to this basic recipe either- make it your own with dried or fresh fruits, nuts, seeds, chocolate chips, peanut butter, cream cheese, etc. The list goes on and on, like these endless early summer nights.

Bran Muffins (makes 12)

1 1/2 c. wheat bran

1 c. buttermilk

1/3 c. vegetable oil

1 egg

2/3 c. brown sugar

1/2 tsp vanilla extract

1 c. all-purpose flour

1 tsp baking soda

1 tsp baking powder

1/2 tsp salt

1/2 c. raisins

Preheat oven to 375F. Grease muffin cups or line with paper muffin liners. Mix together wheat bran and buttermilk and let stand for 10 minutes. In a separate bowl, beat together oil, egg, sugar and vanilla. Add to the buttermilk/bran mixture. Sift together dry ingredients, then stir flour mixture into buttermilk mixture, until just blended. Fold in raisins and spoon batter into prepared muffin tins. Bake for 15 to 20 minutes, or until a toothpick inserted into the center of a muffin comes out clean.

Happy baking!

B

KBwB-BFlower-50Baking with B appears every other Monday on the Keeping Busy with B Blog. Find out why I like baking so much here. For more of my baking, click here. And for even more recipe inspiration, check out my Pinterest full of food eye candy that will have you licking your computer. Promise.