Baking with B: Chocolate Peanut Butter Banana Cake

Back in college when my ex-boyfriend’s mom was visiting we knew it could only mean one thing- she was going to be bringing this famous cake that I dubbed “Mama B Cake”. It earned its fame mainly because it was the only thing that “Mama B” could (or would) bake. When she made it for you, you knew it was something kind of special. The cake was its own kind of love so I imagine that’s why it always tasted so good. Try as I might, my version will never be delicious as hers. (I’ve searched around for the original recipe for ages, but this one I found here was the closest I could get.)

Chocolate Peanut Butter Banana Cake

1 c. all-purpose flour

1 tsp baking soda

1/4 tsp salt

1 c. overripe bananas, mashed (about 3)

1/4 c. vegetable oil

1/2 c. smooth peanut butter

3/4 c. brown sugar

1 egg

1 tsp vanilla

2 tbsp cocoa powder

Preheat oven to 350F. Grease and flour a 9×5 loaf pan and set aside. In a medium bowl, whisk together flour, baking soda and salt. In another medium bowl, whisk together peanut butter, banana, oil, sugar, egg and vanilla until thick and yellow. Slowly add the wet ingredients to the dry, one spoonful at a time, until well combined. Pour half of the batter into prepared pan. Add cocoa to the remaining batter, stirring until combined. Dollop the chocolate batter onto the peanut butter batter, then swirl to combine using a wooden skewer.

B’s Tip: If you don’t have skewers lying around, use a chopstick, a cake tester, a knife, the handle of your mixing spoon- anything that’s long and thin!

Bake for approximately 50 minutes until knife comes out clean in the middle. Cool for approximately 10 minutes in pan before turning out onto wire rack. Let cool completely before serving.

Baking with B appears every other Monday on the Keeping Busy with B Blog. Find out why I like baking so much here. For more of my baking, click here. And for even more recipe inspiration, check out my Pinterest full of food eye candy that will have you licking your computer. Promise.

Baking with B: Chocolate Guinness Cake

Chocolate? Beer? Lime? I know what you’re thinking- how could these ingredients possibly go together?

Here’s the answer: I don’t know. But believe me, it works. The beer gives the chocolate a rich, deep flavour and the lime zest brightens things up so the cake doesn’t feel as heavy Even if you’re not a fan of Guinness (or beer in general), this is still a great cake for any chocolate lover and is perfect for St. Patrick’s Day (And no, that’s not some leprechaun trick!)

Chocolate Guinness Cake (serves 12)

1 c. Guinness beer

1 c. unsalted butter

¾ c. unsweetened cocoa powder

2 c. white sugar

2/3 c. regular sour cream

2 large eggs

1 tbsp vanilla

2 c. all-purpose flour

2 ½ tsp baking soda

icing sugar for garnish (optional)

lime zest for garnish (optional)

Preheat oven to 350F. Butter 9-inch pan and line bottom with parchment paper. Pour Guinness into large saucepan over medium heat. Add butter and heat until melted. Remove from heat and whisk in cocoa powder and sugar. Set aside. In a bowl, combine sour cream, eggs, and vanilla and beat until smooth. Add sour cream mixture to Guinness mixture, and whisk to combine. Whisk in flour and baking soda, then pour batter into prepared pan. Bake 50-60 minutes, at 350F, until tester comes out with a few crumbs clinging to it. Cool and serve with a sprinkle of icing sugar and lime shavings on top.

B’s Tip: Yeah, yeah I know it sounds weird, but go with the lime shavings! It’s honestly one of the best things about the cake.

Baking with B appears every other Monday on the Keeping Busy with B Blog. Find out why I like baking so much here. For more of my baking, click here. And for even more recipe inspiration, check out my Pinterest full of food eye candy that will have you licking your computer. Promise.

Baking with B: Chocolate Beet Cake

Aarrggh! I gave the secret ingredient away in the title already. You may wish to be less forthcoming than I have been- beets have a bad rap for being so red, so earthy-flavored, so…beet-ish. However, when they’re mixed with chocolate for some reason it just works. (I’d like to know more about the person who came up with that idea.)

I don’t often foray into baking with vegetables (except this time) that but that lonely can of beets in my cupboard (plus my friends’ insistence that it could not be done) inspired me to make a Chocolate Beet Cake and honestly? It’s kind of marvelous. Don’t trust me? Try it yourself! It’s been loosely adapted on this recipe I found here.

Chocolate Beet Cake (makes 2 9-inch round cakes)

3/4 c. butter

2 c. white sugar

3 eggs

2 1/2 c. all-purpose flour

1/2 c. cocoa powder

1 1/2 tsp baking soda

1/2 tsp salt

1 c. milk

1 14-oz. can of beets, drained and rinsed, with 1/2 c. of beet juice for reserve

1/2 c. reserved beet juice

First, you gotta puree those beets. Use your blender, slap-chop, whatever- just get ‘er done. Me, I went the old-fashioned way, simmering the beets in a saucepan on the stove until super moist before going at them with my hand-blender. Set aside beets aside.

Preheat the oven to 350F. In a medium bowl, combine flour, cocoa, baking soda and salt. In a separate bowl, cream together butter and sugar before adding eggs. Beat until thick and frothy. Slowly start adding the dry ingredients to the wet ingredients a bit at a time, alternating with the milk until fully combined.

Remember those beets? Stir them in last, then the beet juice you’ve saved from the can. Grease and flour two 9-inch round or square baking pans and pour batter into pans. Cook for about 25 minutes, or until a toothpick or a knife comes out clean when inserted.

B’s Tip: You know what they say about buying good-quality cocoa powder? Yeah, I laughed too, but I wasn’t laughing after a friend gave me some of hers to use in this cake. It honestly makes a world of difference so if you can afford it (or if it’s a special occasion) I highly recommend using the best you can find for this recipe.

Happy baking!

B

Baking with B appears (usually) every other Monday on the Keeping Busy with B Blog. Find out why I like baking so much here. For more of my baking, click here. And for even more recipe inspiration, check out my Pinterest full of food eye candy that will have you licking your computer. Promise.

Baking with B: Cherry Vanilla Cake

It’s been quite some time since I’ve written a post about something I’ve made- and the truth is, I haven’t really been baking as much as I used to. Seeing all the fresh fruit around at this time of year, however, sparked my interest again. That, and having a friend who has a cherry pitter gave me a great deal of encouragement. (Don’t have one? I suggest you befriend someone who does, immediately.)

Cherry Vanilla Cake (serves 8-12)

2/3 c. butter, softened

4 eggs

1 1/2 c. sugar

2 tsp vanilla extract

2 1/2 c. all-purpose flour

4 tsp baking powder

1 c. milk

2 c. fresh cherries, pitted and chopped

Vanilla Buttercream Frosting

1 1/2 c. butter, softened

2 c. icing sugar, sifted

1/2 tsp vanilla extract


Preheat the oven to 350F. Melt butter, set aside. In a bowl, beat eggs and sugar until light yellow and very thick (use a mixer if you’re not brave enough to do it by hand). Stir in the vanilla. In a separate bowl, combine flour and baking powder. Add dry ingredients to the egg mixture a little bit at a time, alternating with the butter and milk. Stir until thoroughly combined. Gently stir in 1 1/2 cups of the cherries, reserving the remainder. Grease and flour two round (6-cup) cake pan. Pour batter into prepared pans and bake on low oven rack for 40-50 minutes. Let cakes rest in pan 10-15 minutes before turning them out on racks to cool.

Next, place the remaining cherries in a small saucepan and cook on low heat, 15-20 minutes, stirring occasionally until mixture resembles thick liquid (you may have to add a pinch of water or two to get the consistency needed). Remove from heat and cool.

To make buttercream frosting, beat butter until creamy and add sugar 1/2 c. at a time, until well combined. Add vanilla extract and beat until smooth.

Slice the top off of your first cake. Spread with buttercream frosting, and spoon over half of the cherry mixture. Place second cake on top and layer with the remaining frosting and cherries. Top with additional fresh cherries, if desired.

I love the combination of vanilla and cherry flavors, and using fresh cherries gives it a sweet-tart flavor instead of using something from a can. There’s so many fresh, local fruits in season though that you could swap the cherries out with virtually anything your little heart desires- this cake recipe is simple enough to support a dazzling array of flavors. This cake would be awesome served warm and as-is, but sometimes it’s nice to go the extra step.

Man, that felt good to share another baking post again. Hopefully I won’t be as long in sharing the next one!

Happy baking!

B

Baking with B appears  (usually) every other Monday on the Keeping Busy with B Blog. Find out why I like baking so much here. For more of my baking, click here. And for even more recipe inspiration, check out my Pinterest full of food eye candy that will have you licking your computer. Promise.

Let Them Eat Cake!

If Marie Antoinette and I have anything in common, it’s that we both love our cake. There’s something so satisfying about embarking on a big, elaborate recipe and once I’m done baking I’m always left with the feeling on having accomplished something. Cake makes me feel good even before the eating part!

Sweet Spell (who nominated me for the One Lovely Blog Award) asked me to participate in a link-up party this week featuring some of the best cakes around the blogosphere. My Honey Mandarin Orange Cake is in there (perfect if you’re experiencing if you’re feeling blue about the colder weather). These fine bloggers have some great cake recipes as well:

sweet-spell-date-cake

Sweet Spell made this decadent looking Date Cake that looks like it would go perfectly with your morning coffee.

cooking-without-limits-date-cakeI’ve been following the blog Cooking without Limits for a while and this Pear Cake is still one of my favorites. The inside is just stunning!

chiaras-baking-buckwheat-cake

Chiara writes in both English and Italian on her cooking blog Chiara’s Baking and her Buckwheat Cake with Jam is simple, sweet and classic to Italy.

good-life-paradise-cake

Paradise Cake sounds just like that- paradise- and the recipe for it can be found over on the blog Searching for the Good Life.

foodie-on-board-chia-cake
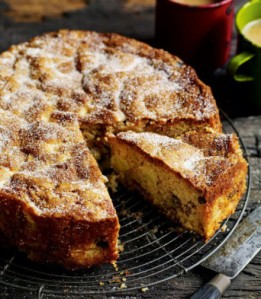
Finally, Foodie on Board has baked the most beautiful Orange and Chia Seed Cake with Sugared Rosemary. I bet you can’t even taste how healthy it is!

Many thanks to Sweet Spell for rounding up all of these great recipes (and great bloggers!) If you’d like to participate in a future link-up party as well give me a shout at keepingbusyb@gmail.com. I always love to hear from and/or drool over your baking pictures!

KBwB-BFlower-50

Original baking party post found here. Find out why I like baking so much here. For more of my baking, click here. My column Baking with B usually appears every other Monday on the Keeping Busy with B Blog. I hope you’ll join me for the next one!

Baking with B: Blueberry Cake with Lemon-Yogurt Drizzle

BFoodPix-Blueberrycake-09I bet y’all want to know what I baked for Easter. It was never an elaborate affair in my household growing up, but now that I’m older and live on my own there’s something nice about having an excuse to have family members over for brunch. This past year the victim was my dad, and he claimed to love the quiche that I made him, although personally I think he liked this cake even more. Don’t tell him- the cake was ten times easier to make!

Blueberry Cake with Lemon-Yogurt Drizzle (serves 8)

Cake

Use your favorite vanilla cake recipe, your favorite pre-packaged mix, or the recipe for my classic vanilla cupcakes here. (Yes! They work in cake format as well.)

Filling

3/4 c. blueberry pie filling

Drizzle

1/3 c. Greek yogurt, plain

6 tbsp icing sugar

lemon juice, to taste

Preheat oven to 325F, then prep your vanilla cake batter. (You can use whichever recipe you’d like, although I highly recommend the one posted here. I may or may not be a little biased.) Grease 2 8-inch round cake pans and bake according to your recipe (approximately 25 minutes or so, or until a knife inserted in the middle comes out clean). Let cakes stand in pan for ten minutes or so to cool before transferring them onto a wire rack.

B’s Tip: You must let both layers cool completely before assembling. Trust me on this one- you’re going to end up ladling out portions of your cake with a spoon if you don’t!

Transfer one cake onto a large serving dish or platter. Generously spread blueberry pie filling over top, taking care to leave approximately half an inch border around the perimeter so all the blueberry goodness doesn’t squirt out. Gently sandwich the second cake overtop of the first one. You may wish to add more blueberry filling to your middle layer by spreading more filling along the side of your cake using the tip of your knife.

In a small mixing bowl, whisk together yogurt and icing sugar until a paste is formed. Add lemon juice as desired (if you’re using flavored yogurt, you may want to leave it as-is). Whisk until mixture is thick and runny, but still opaque. Let stand approximately 10 minutes and mix once more before drizzling over your cake in your favorite pattern, or spread using a flat knife or spatula for a more coated look.

I love the flavors of blueberry and lemon together, but this cake is so simple it’s easy to change out the blueberries for another favorite fruit filling. You may want to experiment with different flavors of yogurt, or another fruit juice to make another killer combo that will have people scratching their heads, wondering how you came up with such an awesome recipe. (Don’t worry- my lips are sealed.)

KBwB-BFlower-50Baking with B appears every other Monday (usually!) on the Keeping Busy with B Blog. Find out why I like baking so much here. For more of my baking, click here. And for even more recipe inspiration, check out my Pinterest full of food eye candy that will have you licking your computer. Promise.

Baking with B: Honey Cakes

9BFP-HoneyCakes-SQ1000

Raise your hand if you don’t like honey. No one? No one? Bueller?

Ok, even if you’re one of those crazy people who does not like the taste of honey (I’m not judging, I promise) please consider giving these a try anyway. The name of the recipe makes these little cakes sound a lot more sickly-sweet than they actually are. In reality, they’re moist and cakey with a hint of fruit flavor that will have you more obsessed with honey than Winnie the Pooh.

Eat them in the morning with fresh fruit, take them with tea in the afternoon, or slather them with marzipan for a tasty dessert. You won’t regret any of it.

Honey Cakes (makes 6)

½ stick butter

¼ c. packed light brown sugar

4 tbsp honey

1 egg

½ tsp vanilla

2 tbsp apple puree

2/3 c. self-rising flour

½ tsp ground cinnamon

¼ tsp ground ginger

Preheat the oven to 350F. Line a muffin pan with 6 baking cups. Put the butter and sugar in a mixing bowl. Pour in the honey and beat everything together until fluffy. In another bowl, beat the egg, vanilla and apple puree, then beat into this butter mixture. Sift over the flour, cinnamon and ginger. Now fold the dry ingredients by running your spatula around the outside of the bowl and across the middle until everything is well mixed. Fill the baking cups with the mixture. Bake for 18-22 minutes, until risen, golden and firm to the touch. Leave to cool on a wire rack.

Happy baking!

B

KBwB-Flower-50

Baking with B appears every other Monday on the Keeping Busy with B Blog. Find out why I like baking so much here. For more of my baking, click here. And for even more recipe inspiration, check out my Pinterest full of food eye candy that will have you licking your computer. Promise.