Baking with B: 7 Days of Christmas Treats: Marshmallow Roll

19bfp7cookies2-cookie5

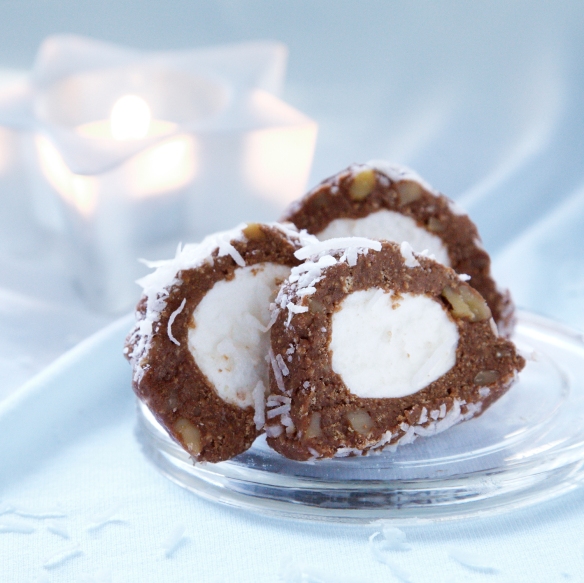
I loved making this cookie simply because of the way it looks- the marshmallow inside reminds me of a little snowball and the coconut coating gives this cookie a light dusting of faux snow.

Just because these marshmallow rolls look so sweet doesn’t mean they actually taste that sweet- using unsweetened chocolate gives this recipe a fudgey flavor and the graham cracker crumbs give it a salty undertone (even if you do opt to go without the nuts).

Marshmallow Roll (makes approximately 24 slices)

2 squares of unsweetened chocolate

10 oz. sweetened condensed milk

2 c. graham cracker crumbs

1/2 c. walnuts, finely chopped

large colored marshmallows

coconut

Melt in chocolate in large saucepan over low heat or hot water. Remove from heat. Stir in milk, crumbs and nuts. Divide into 2 portions. On piece of wax paper press out 1 portion 1/4-inch thick. Form into wide enough shape to go around marshmallow. Place various colors of marshmallow end to end and bring up batter to go around, pinching dough to join.

B’s Tip: Do make sure that you’re generous when measuring out the graham cracker crumbs- this dough is incredibly sticky and hard enough to handle as it is! P.S. Wax paper is also a must for easier rolling and clean up.

Coat with coconut. Repeat for other half. Wrap in wax paper. Store in plastic wrap in refrigerator. Cut with knife dipped in water. Clean knife between cuts. Slice thinly to serve.

B’s Tip: These recipe can be stored up for up to a week in an airtight container in the refrigerator. If you can stand it, wait another 24 hours after slicing to try for an even chewier treat.

Happy baking!

B

KBwB-Flower-50

Last year I counted down to Christmas by baking seven different types of Christmas cookies as per my favorite Swedish holiday tradition. This year I’m making it a thing, and sharing seven more delicious recipes with you. For more inspiration, you can check out more of my baking here. For even more recipe inspiration check out my Pinterest full of food eye candy that will have you licking your computer. Promise.

Classic Oatmeal Cookies for the Photographer

BFoodPix-OatmealCookie-39

I’ve been acting kind of like a spaz lately, and my photographer has been really good about it. (If you dig what he did here, here, here, here, here and here then I highly recommend him for your own project! He’s available for hire here.) He’s also really appreciative of my baking and inevitably ends up eating some of what he shoots for me. So when it was time to make something for another post and he asked me what I was baking I had been feeling kind of listless, and I shot back out, “Oh, whatever you want!”

Readers, he took me literally.

And it actually ended up being a fun experiment. His request was oatmeal cookies like the kind that his mom used to make-crunchy on the outside, chewy on the inside, and so addictive you have to eat them by the handful.

It was a tall order because I realized I had never actually made oatmeal cookies; like straight-up, honest-to-goodness oatmeal cookies. I was a little nervous (especially after the first batch came out a little too crisp) but once I perfected the baking time these were the perfect consistency. They’re not too sweet but they’ve got the slightest salty bite that makes them mouth-watering.

My photographer gave them two thumbs up. Then he took the lovely picture you see above. I’m not sure which he enjoyed more- shooting the cookies or eating them.

Classic Oatmeal Cookies (makes 48)
(adapted from here)

1 c. butter, softened

1 c. white sugar

1 c. packed brown sugar

2 eggs, slightly beaten

2 c. all-purpose flour

1 tsp baking soda

1 tsp salt

1 1/2 tsp ground cinnamon

3 c. quick cooking oats

In a medium-sized bowl, cream together butter and both sugars. Add eggs and stir. In a separate bowl, combine flour, baking soda, salt and cinnamon and add to wet ingredients, a little bit at a time, until fully combined. Mix in oats. Cover and let chill for at least one hour.

Preheat the oven to 375F. Roll dough into balls roughly the size of walnuts, and place 2 inches apart on pre-greased cookie sheets. Use a fork to gently flatten each cookie. Bake for 8-10 minutes before transferring to a wire rack to cool.

B’s Tip: If you prefer a chewier oatmeal cookie, bake for only 8 minutes and transfer to wire rack while still hot. Use a clean spatula and be careful- they may still be puffy and a little fragile!

The best part about adding yet another basic recipe to my repertoire is a chance to make it my own, and I’m already thinking about my next batch now that I’ve perfected my technique. Dried fruits, nuts, chocolate chips; or maybe all of the above. These cookies would taste good no matter what.

Happy baking!

B

KBwB-BFlower-50

Baking with B appears every other Monday on the Keeping Busy with B Blog. Find out why I like baking so much here. For more of my baking, click here. And for even more recipe inspiration, check out my Pinterest full of food eye candy that will have you licking your computer. Promise.

Baking with B: The Deconstructed Peanut Butter Cookie

BFoodPix-PBCookies-1500

Oh man. My mom used to make these all the time when I was little. I hadn’t had them in forever, and then there was all this peanut butter in the house- needless to say, revisiting this recipe was long overdue.

Lately, I’ve been reading so many recipes that are junked-up versions of old favorites which is why I call this the “deconstructed” version of a peanut butter cookie. It’s just that- three ingredients, plain and simple, not too sweet and super peanut-y good.

The Deconstructed Peanut Butter Cookie (makes 24)

1 c. unsweetened, smooth peanut butter

1/2 c. brown sugar

1 egg, beaten

Preheat oven to 325F. In a medium bowl, cream sugar and peanut butter until well blended. Mix in egg until batter starts forming a smooth, sticky ball. Scooping out portions by the spoonful, roll batter into balls and place approximately 2 inches apart on tray. Flatten with criss-cross patterns using the tines of a fork.

B’s Tip: To make sure you have a clean criss-cross pattern, have a glass of cold water handy so that when your fork gets too sticky you can dip it in and clean away some of the excess.

Bake for 15 minutes. Do not overbake. Cookies will look soft and puffy when they first come out of the oven, but will harden once you leave to cool on the baking tray for 5 minutes. Remove to wire racks and let cool completely before serving.

Now just because I call this the “deconstructed” peanut butter cookie doesn’t mean you can’t make of the recipe what you will. You may want to experiment with different flavors of nuts, or adding chocolate or butterscotch chips for a hint of sweetness. Or why not try something daring, like mixing in dried fruit, shredded coconut, or broken pretzel pieces? These cookies are super crumbly and buttery and would also taste great by themselves sprinkled over ice cream, or even on top of a cake.

Who says you can’t play with your food?

KBwB-BFlower-50

Baking with B appears every other Monday on the Keeping Busy with B Blog. Find out why I like baking so much here. For more of my baking, click here. And for even more recipe inspiration, check out my Pinterest full of food eye candy that will have you licking your computer. Promise.