Come Fika With Me

KBB_fikaEver since I was a little girl, I have enjoyed the Swedish practice of “fika” (explained so wonderfully and succinctly in the meme above). Similar to English “high tea”, “fika” is a perfect excuse to a take a restorative break from our busy day and enjoy a cup of coffee and maybe even a little treat.

My Swedish mother got me started on the practice early. (I’m pretty sure the first appliance I learned how to use in our kitchen was the coffeemaker. Now there’s strategic parenting for you!) Both of my parents worked from home and it wasn’t unusual to put on a pot of coffee in the afternoon and have the members of my family slowly drift into the kitchen once the small wafted through the house. My mother baked often and there would always be something sweet stashed somewhere in the kitchen. She taught my sister and I the basics of baking at an early age and I still have her chocolate brownie recipe memorized (it also happens to be the first baked good I ever shared on this blog here).

I definitely think that my love of fika has fostered my love of baking and I love sharing my baking with you online almost as much as I do sharing it in real life. Come and join my fika party by trying one (or more!) of my favorite recipes here, or share your favorite recipes or fika ideas by commenting below or emailing at me at keepingbusyb@gmail.com

KBwB-PageBreak-35

Baking with B: Best-Ever Bran Muffins

KBB_baking_bran_muffins 
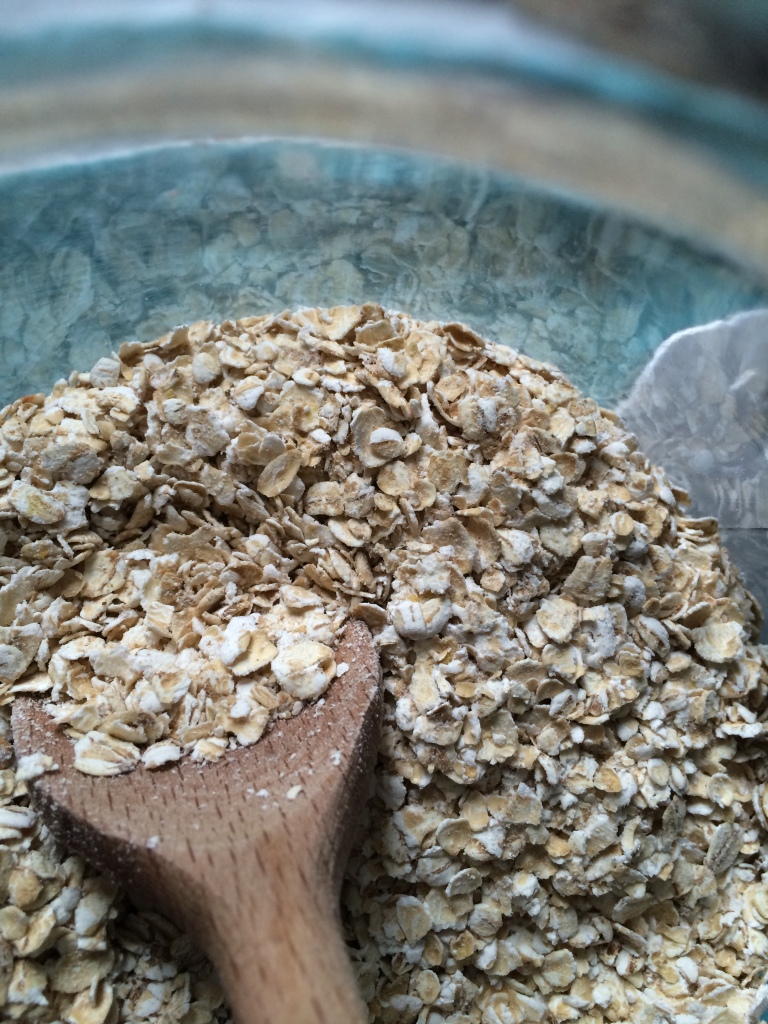
Days like these when the sun is bright and the weather is warm it’s too tempting to go outside instead of staying indoors and doing something boring like eating breakfasts. In the mornings when I’m feeling like I want to go, go, go it’s great to have these around to take to the library, to work or even for a snack on a particularly long dog walk. Don’t limit yourself to this basic recipe either- make it your own with dried or fresh fruits, nuts, seeds, chocolate chips, peanut butter, cream cheese, etc. The list goes on and on, like these endless early summer nights.

Bran Muffins (makes 12)

1 1/2 c. wheat bran

1 c. buttermilk

1/3 c. vegetable oil

1 egg

2/3 c. brown sugar

1/2 tsp vanilla extract

1 c. all-purpose flour

1 tsp baking soda

1 tsp baking powder

1/2 tsp salt

1/2 c. raisins

Preheat oven to 375F. Grease muffin cups or line with paper muffin liners. Mix together wheat bran and buttermilk and let stand for 10 minutes. In a separate bowl, beat together oil, egg, sugar and vanilla. Add to the buttermilk/bran mixture. Sift together dry ingredients, then stir flour mixture into buttermilk mixture, until just blended. Fold in raisins and spoon batter into prepared muffin tins. Bake for 15 to 20 minutes, or until a toothpick inserted into the center of a muffin comes out clean.

Happy baking!

B

KBwB-BFlower-50Baking with B appears every other Monday on the Keeping Busy with B Blog. Find out why I like baking so much here. For more of my baking, click here. And for even more recipe inspiration, check out my Pinterest full of food eye candy that will have you licking your computer. Promise.

Baking with B: White Chocolate Fudge Bars

You guys know me and how I’m just a wee bit obsessed with brownies. My love affair started with chocolate, and continued with these butterscotch ones my mom used to make, and evolved so that I adapted the chocolate brownie recipe to suit the dietary needs of my vegan friends. Of course, this hasn’t stopped me from experimenting with even more flavor combinations (maybe I’ll share some more in an upcoming post?) but for now I couldn’t resist trying this chocolate, fudgey variety that taste just as good as they sound.

White Chocolate Fudge Bars (makes 16)

1/2 cup unsalted butter

8oz white chocolate chips (or your favorite white chocolate bar)

3/4 cups granulated sugar

2 eggs

1/2 teaspoon salt

1 teaspoon vanilla extract

1 cup all purpose flour

Preheat oven to 350F. Melt the butter with the white chocolate using a double boiler, by heating it in a glass bowl in the microwave, or by making your own makeshift double boiler.

B’s Tip: To make your own double-boiler, fill a small saucepan a third of the way full with water. Set a bowl on top (not plastic) and make sure it’s big enough to rest on the rim of the pot without fully being immersed in the water at the bottom. Place the butter and white chocolate in the bowl. Bring the saucepan to a boil on the stove. Stir gently and watch the mixture melt like magic!

Add sugar to the butter/chocolate mixture and mix well. Mix in the salt, vanilla, and eggs until incorporated. Stir in flour until well combined. Spread batter into a greased 8″ pan. Bake for 28 minutes. Let cool completely before cutting into squares.
Happy baking!

B

KBwB-BFlower-50

Baking with B appears every other Monday on the Keeping Busy with B Blog. Find out why I like baking so much here. For more of my baking, click here. And for even more recipe inspiration, check out my Pinterest full of food eye candy that will have you licking your computer. Promise.

Baking with B: Blueberry Cake with Lemon-Yogurt Drizzle

BFoodPix-Blueberrycake-09
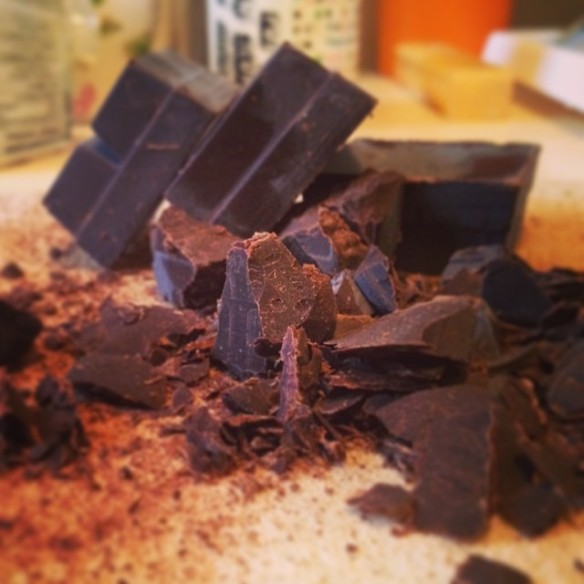
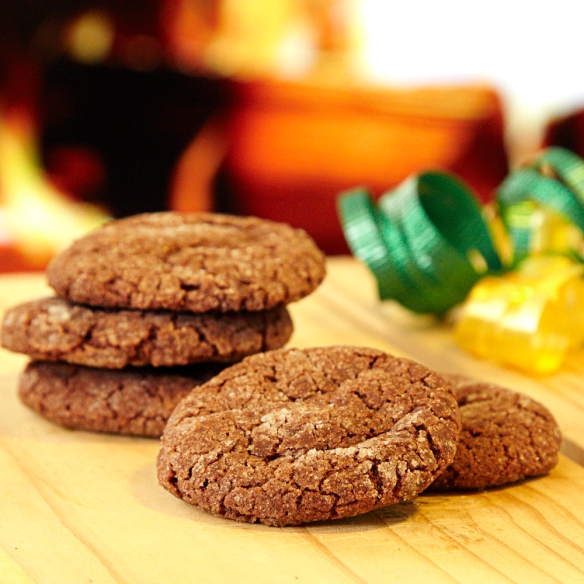
I bet y’all want to know what I baked for Easter. It was never an elaborate affair in my household growing up, but now that I’m older and live on my own there’s something nice about having an excuse to have family members over for brunch. This past year the victim was my dad, and he claimed to love the quiche that I made him, although personally I think he liked this cake even more. Don’t tell him- the cake was ten times easier to make!

Blueberry Cake with Lemon-Yogurt Drizzle (serves 8)

Cake

Use your favorite vanilla cake recipe, your favorite pre-packaged mix, or the recipe for my classic vanilla cupcakes here. (Yes! They work in cake format as well.)

Filling

3/4 c. blueberry pie filling

Drizzle

1/3 c. Greek yogurt, plain

6 tbsp icing sugar

lemon juice, to taste

Preheat oven to 325F, then prep your vanilla cake batter. (You can use whichever recipe you’d like, although I highly recommend the one posted here. I may or may not be a little biased.) Grease 2 8-inch round cake pans and bake according to your recipe (approximately 25 minutes or so, or until a knife inserted in the middle comes out clean). Let cakes stand in pan for ten minutes or so to cool before transferring them onto a wire rack.

B’s Tip: You must let both layers cool completely before assembling. Trust me on this one- you’re going to end up ladling out portions of your cake with a spoon if you don’t!

Transfer one cake onto a large serving dish or platter. Generously spread blueberry pie filling over top, taking care to leave approximately half an inch border around the perimeter so all the blueberry goodness doesn’t squirt out. Gently sandwich the second cake overtop of the first one. You may wish to add more blueberry filling to your middle layer by spreading more filling along the side of your cake using the tip of your knife.

In a small mixing bowl, whisk together yogurt and icing sugar until a paste is formed. Add lemon juice as desired (if you’re using flavored yogurt, you may want to leave it as-is). Whisk until mixture is thick and runny, but still opaque. Let stand approximately 10 minutes and mix once more before drizzling over your cake in your favorite pattern, or spread using a flat knife or spatula for a more coated look.

I love the flavors of blueberry and lemon together, but this cake is so simple it’s easy to change out the blueberries for another favorite fruit filling. You may want to experiment with different flavors of yogurt, or another fruit juice to make another killer combo that will have people scratching their heads, wondering how you came up with such an awesome recipe. (Don’t worry- my lips are sealed.)

KBwB-BFlower-50Baking with B appears every other Monday (usually!) on the Keeping Busy with B Blog. Find out why I like baking so much here. For more of my baking, click here. And for even more recipe inspiration, check out my Pinterest full of food eye candy that will have you licking your computer. Promise.

Baking with B: The Deconstructed Peanut Butter Cookie

BFoodPix-PBCookies-1500

Oh man. My mom used to make these all the time when I was little. I hadn’t had them in forever, and then there was all this peanut butter in the house- needless to say, revisiting this recipe was long overdue.

Lately, I’ve been reading so many recipes that are junked-up versions of old favorites which is why I call this the “deconstructed” version of a peanut butter cookie. It’s just that- three ingredients, plain and simple, not too sweet and super peanut-y good.

The Deconstructed Peanut Butter Cookie (makes 24)

1 c. unsweetened, smooth peanut butter

1/2 c. brown sugar

1 egg, beaten

Preheat oven to 325F. In a medium bowl, cream sugar and peanut butter until well blended. Mix in egg until batter starts forming a smooth, sticky ball. Scooping out portions by the spoonful, roll batter into balls and place approximately 2 inches apart on tray. Flatten with criss-cross patterns using the tines of a fork.

B’s Tip: To make sure you have a clean criss-cross pattern, have a glass of cold water handy so that when your fork gets too sticky you can dip it in and clean away some of the excess.

Bake for 15 minutes. Do not overbake. Cookies will look soft and puffy when they first come out of the oven, but will harden once you leave to cool on the baking tray for 5 minutes. Remove to wire racks and let cool completely before serving.

Now just because I call this the “deconstructed” peanut butter cookie doesn’t mean you can’t make of the recipe what you will. You may want to experiment with different flavors of nuts, or adding chocolate or butterscotch chips for a hint of sweetness. Or why not try something daring, like mixing in dried fruit, shredded coconut, or broken pretzel pieces? These cookies are super crumbly and buttery and would also taste great by themselves sprinkled over ice cream, or even on top of a cake.

Who says you can’t play with your food?

KBwB-BFlower-50

Baking with B appears every other Monday on the Keeping Busy with B Blog. Find out why I like baking so much here. For more of my baking, click here. And for even more recipe inspiration, check out my Pinterest full of food eye candy that will have you licking your computer. Promise.

Baking with B: Classic Pecan Pie

I have this theory that we date the same people over and over again. Some attribute this phenomenon to a psychological need to look for partners that emulate our parents, but I’m convinced that there are also certain things that attract us to certain people, and make us attractive to others in turn. For example, I inexplicably keep on finding these guys who list pecan pie at the top of their favorite desserts and it is for this reason that I have made this pie more than any other. Go figure.

Classic Pecan Pie

3 eggs, slightly beaten

1/2 c. brown or white sugar

1/4 tsp salt

1 c. light corn syrup

1/2 tsp vanilla

1 c. pecans, broken in pieces

Set the oven at 450F. Line a 9″ pie pan with your preferred kind of pastry (I have a recipe on how to make a traditional pie crust here; however, for this recipe I would recommend using something more like a pressed graham-cracker crust. You can make it yourself or find them pre-packaged at the grocery store.) Mix ingredients and pour into pan. Bake for 10 minutes. Reduce heat to 350F and bake 35 minutes longer. Chill. Serve with whipped cream and halved pecans for garnish. (Because yum.)

Happy baking!

B

KBwB-BFlower-50

Baking with B appears every other Monday on the Keeping Busy with B Blog. Find out why I like baking so much here. For more of my baking, click here. And for even more recipe inspiration, check out my Pinterest full of food eye candy that will have you licking your computer. Promise.

Baking with B: Maple Syrup Muffins

BFP MapleMuffins-5787-1000

Let’s be honest with each other here; I’m not that into maple flavor. (Yes, I realize that makes me a bad Canadian.) Give me chocolate, chocolate, chocolate any day. There are times, though, when I have to make an exception and these muffins were meant to break my maple rule. My mom used to make these when I was younger and I’m happy to keep the recipe in my repertoire- they’re not sweet or fake-tasting but full of real, honest-to-goodness mapley flavor that’ll make you want to dig out your best plaid shirt. Aunt Jemima is not invited.

Maple Syrup Muffins

Muffins:

½ c. soft margarine or butter, room temperature

½ c. granulated sugar

1 tsp. salt

1 ½ c. all-purpose flour

¾ c. rolled oats

½ c. milk

½ c. maple syrup

Icing:

1 tbsp butter, room temperature

½ c. sifted icing sugar

3 tbsp maple syrup

Preheat oven to 350F. Grease 12 muffin cups or coat with cooking spray. In a medium-size mixing bowl, beat margarine with sugar and salt until evenly combined. Measure flour, baking powder, and oats into a small mixing bowl. Stir with a fork until well mixed, then stir into margarine mixture. In a measuring cup or small bowl, stir milk with maple syrup. Pour into batter, stirring just until combined.

Immediately spoon batter into muffin cups. Bake in centre at 350F oven until golden and a cake tester inserted into centre of a muffin comes out clean, about 20-23 minutes.

To make icing, stir butter with icing sugar and first tablespoon of maple syrup until smooth. If icing is too thick, stir in additional maple syrup, little by little if needed, until the icing is spreadable but not runny.

B’s Tip: Don’t freak out and think that you’ve made too much icing- you’ll figure out why once you start icing the muffins. The heat lets the icing pool and eventually level and harden- which is why it’s best to eat them super quick!

Remove muffins from oven and let stand for 5 minutes. Spread tops with icing and then remove from pan. Place muffins on a cooling rack. Serve warm. Store muffins in a sealed bag or at room temperature for up to 2 days. For longer storage, refrigerate or preferably freeze.

Happy baking!

B

KBwB-BFlower-50Baking with B appears every other Monday on the Keeping Busy with B Blog. Find out why I like baking so much here. For more of my baking, click here. And for even more recipe inspiration, check out my Pinterest full of food eye candy that will have you licking your computer. Promise.

Baking with B: Date Squares

IMG_0440

Let’s make a date, shall we, for some mid-winter treats that serve up a nice hit of sweetness without being too unhealthy. When you combine dates with oats and pecans it’s practically like granola, which means I’m totally allowed to eat these for breakfast, right? Right? I dare you not to eat them as a meal, either.

Date Squares (serves 12)

1 1/2 c. chopped, pitted dates

1/4 c. granulated sugar

1 c. orange juice

1 tsp grated orange zest

1 1/4 c. quick-cooking oats

1 c. all-purpose flour

3/4 c. packed brown sugar

1/4 c. chopped toasted pecans

1 tsp ground cinnamon

1/2 c. vegetable oil

1/4 c. water

Preheat the oven to 350F. Combine dates, sugar and orange juice in a saucepan and bring to a boil. Reduce heat to medium and let simmer for 15 minutes, or until the dates are soft and the liquid is absorbed. Mash the mixture and set aside to cool. Meanwhile, combine orange zest, oats, flour, brown sugar, pecans, cinnamon, oil and water in a bowl until combined. Pat half of the mixture onto the bottom of a greased 8″ square baking dish. Spread the cooled date mixture over top. Sprinkle the remaining oat mixture on top of the dates for the third layer. Bake in center of the oven for 25 minutes or until squares are golden. Cool before serving.

B’s Tip: Who doesn’t like pecans? Ok, maybe you’re actually one of these crazy people that doesn’t. This recipe can still be salvaged. I’d be willing to substitute for walnuts, or maybe almonds. It’s too hard to decide! Your squares, your choice, and let me know how it works for you.

Happy baking!

B

KBwB-BFlower-50Baking with B appears every other Monday on the Keeping Busy with B Blog. Find out why I like baking so much here. For more of my baking, click here. And for even more recipe inspiration, check out my Pinterest full of food eye candy that will have you licking your computer. Promise.


Baking with B: Vegan Brownies

Chopped Chocolate

With so many friends becoming health-conscious recently, I just had to dig out this old favourite from my high school days. We had one vegan in our group of friends and it became a tradition to bring cruelty-free treats to every party he attended. Plus, all the fruit in them makes me feel a whole less guilty about eating them because they’re healthier, right? At least that’s what I tell myself so I can sleep easier at night.

Vegan Brownies

10 oz. applesauce (bonus points if you have some homemade!)

8 oz. cocoa powder or baking chocolate, melted

¼ tsp salt

2 c. sugar

1 banana

1 1/3 c. flour

2 c. chocolate chips (approximately)

Beat the above with a fork until smooth. Pour into a square 8×8” pan for traditional square brownies. Bake at 350F for 35 minutes.

B’s Tip: Not all chocolate chips are created equally! Make sure you use chocolate chips that don’t contain any milk or milk by-products to make this recipe as vegan-friendly as possible. There are also plenty of other vegan, health-conscious substitutions out there such as cocoa nibs that would also probably taste really great, especially because the sugar content of these babies is already so high.

Unlike these chocolate brownies that I usually make, these ones have a slightly fruity flavor and are very moist and sticky. I’m looking forward to enjoying them with my favorite new vegan discovery- ice cream that’s made from coconut milk. I’ll update you as soon as I’ve tried one. Or two. Or five.

Happy baking!

B

KBwB-Flower-50

Baking with B appears every other Monday on the Keeping Busy with B Blog. Find out why I like baking so much here. For more of my baking, click here. And for even more recipe inspiration, check out my Pinterest full of food eye candy that will have you licking your computer. Promise.


Baking with B: 7 Days of Christmas Cookies: Chocolate Crinkle Cookies

18bfp-7cookies1-092

There used to be this coffee shop down the street from my apartment that used to have not only amazing gelato and lattés, it also had one of my favourite treats ever. For a not-quite-vegan like myself, I was shocked to learn that these babies have no dairy in them whatsoever.

Chocolate crinkle cookies: great around Christmas time, great around any time. They look crunchy because of the way the broken cookie crust outer layer, but the inside is moist and dense and chewy and oh-so-good. Excuse me while I wipe the drool off of my screen.

Buying all these cookies was becoming kind of a problem for me, so I did some searching until I found this recipe from clockworklemon.com. They’re the closest I’ve come to finding a recipe that matched the ones they make in the café so now I can make them at home just to make things a little easier on my wallet.

Vegan-Friendly Chocolate Crinkle Cookies (makes approximately 24 cookies)

3/4 c. sugar

1/3 c. vegetable oil

2 tbsp corn syrup

1 tsp vanilla extract

1/3 c. soy milk

1 tbsp ground flax seeds

powdered sugar and granulated sugar

4 oz (about 1/2 a cup) semisweet chocolate chips, melted

1 1/4 c. + 2 tbsp all purpose flour

2 tbsp cocoa powder

3/4 tsp baking powder

1/4 tsp salt

In a bowl, mix together sugar, oil, corn syrup, vanilla, soy milk, flax seeds, and melted chocolate until smooth. Sift in the flour, cocoa, baking powder and salt. Mix until thick dough forms. Chill the dough in the fridge for 15 minutes. In the meantime, pour granulated sugar onto a plate and powdered sugar on another. When dough is ready, roll into balls approximately the size of a tablespoon and roll them in the granulate sugar, then the powdered sugar. Place cookies on a parchment-lined cookie sheet approximately 2 inches apart and bake at 325F for about 14 minutes. Let cookies cool on tray about five minutes before transferring them to a cooling rack.

B’s Tip: Soy milk not your thing? I substituted for almond milk and it tasted just fine. You could also could try rice milk- let me know what works for you!

If you’re doing something for Santa, why not make these to serve with a glass of milk? Or maybe he’d like them after a light lunch, with his favorite espresso-based drink? Soy lattés are my poison of my choice. I mean his poison of choice. I mean…whatever.

Happy baking!

B

KBwB-Flower-50

I’m counting down Christmas by sharing some of my favourite holiday cookie recipes with you! This is the last day I’m posting my cookie recipes, but for more inspiration, you can check out more of my baking here. For even more recipe inspiration check out my Pinterest full of food eye candy that will have you licking your computer. Promise.